Flowclass allow you to customize the information you want to collect from the students when they are enrolling in your course. We provide multiple types of fields so you can create a page with sections and detailed forms.
How Application Forms Work #
Following is an example of an application form that utilized our features fully.
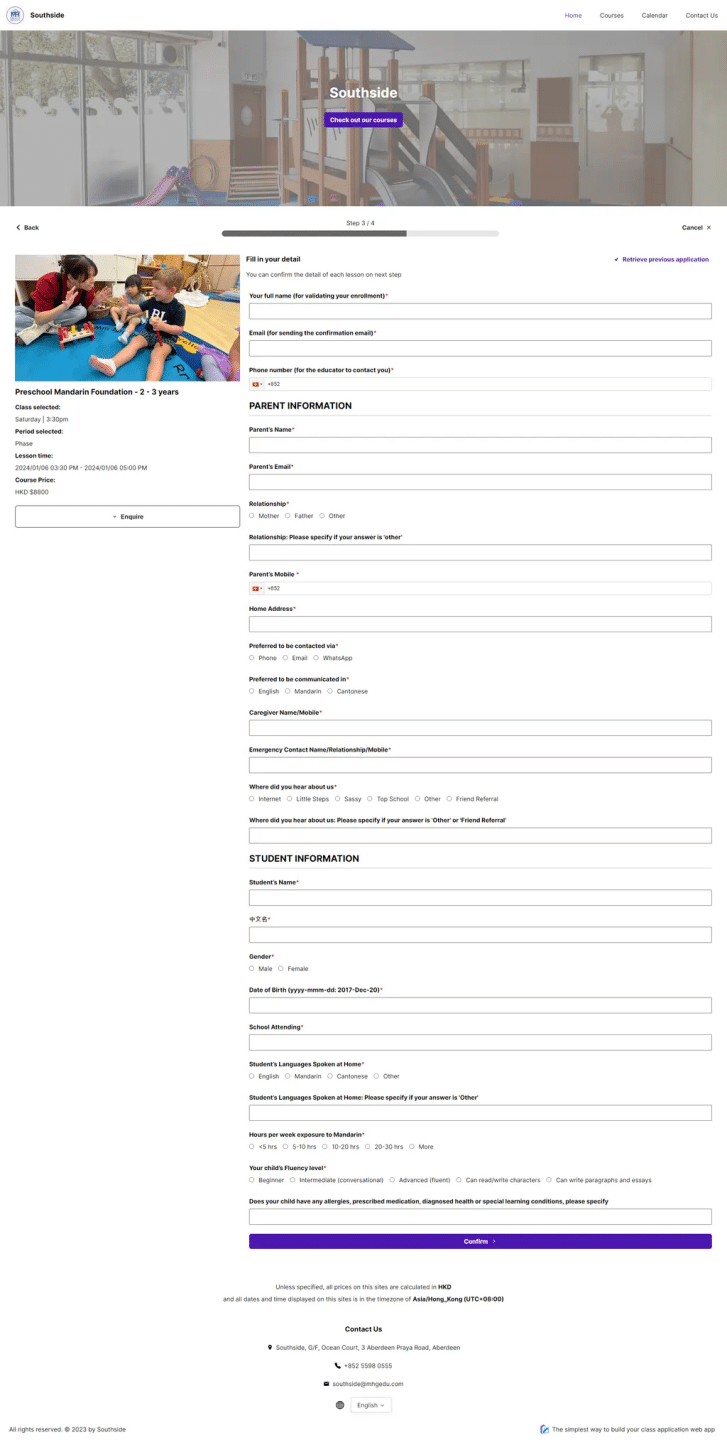
Applicant Details
- Fields for Contact Information:
- Full Name
- Email Address
- Phone Number
- Instructional Text: Clear guidance is provided to help users understand the purpose of each field (e.g., “Your full name for validating your enrollment”).
Details About the Parent/Guardian
- Relationship Options: Applicants can select from predefined relationships (e.g., Mother, Father, Other).
- Contact Preferences:
- Preferred communication method (e.g., Phone, Email, WhatsApp).
- Preferred language for communication (e.g., English, Mandarin, Cantonese).
- Additional Fields:
- Home Address
- Parent’s Mobile
- Caregiver and Emergency Contact Information
Details About the Student
- Basic Information:
- Student’s Name (English and Chinese)
- Gender
- Date of Birth
- Educational Background:
- Current School Attending
- Languages Spoken at Home (e.g., English, Mandarin, Cantonese)
- Exposure to Mandarin (hours per week)
- Fitness Level: Applicants can select the child’s Mandarin proficiency level (e.g., Beginner, Intermediate, Advanced).
- Health Information: A free-text field for disclosing allergies, medications, or special learning needs.
Create Application Forms #
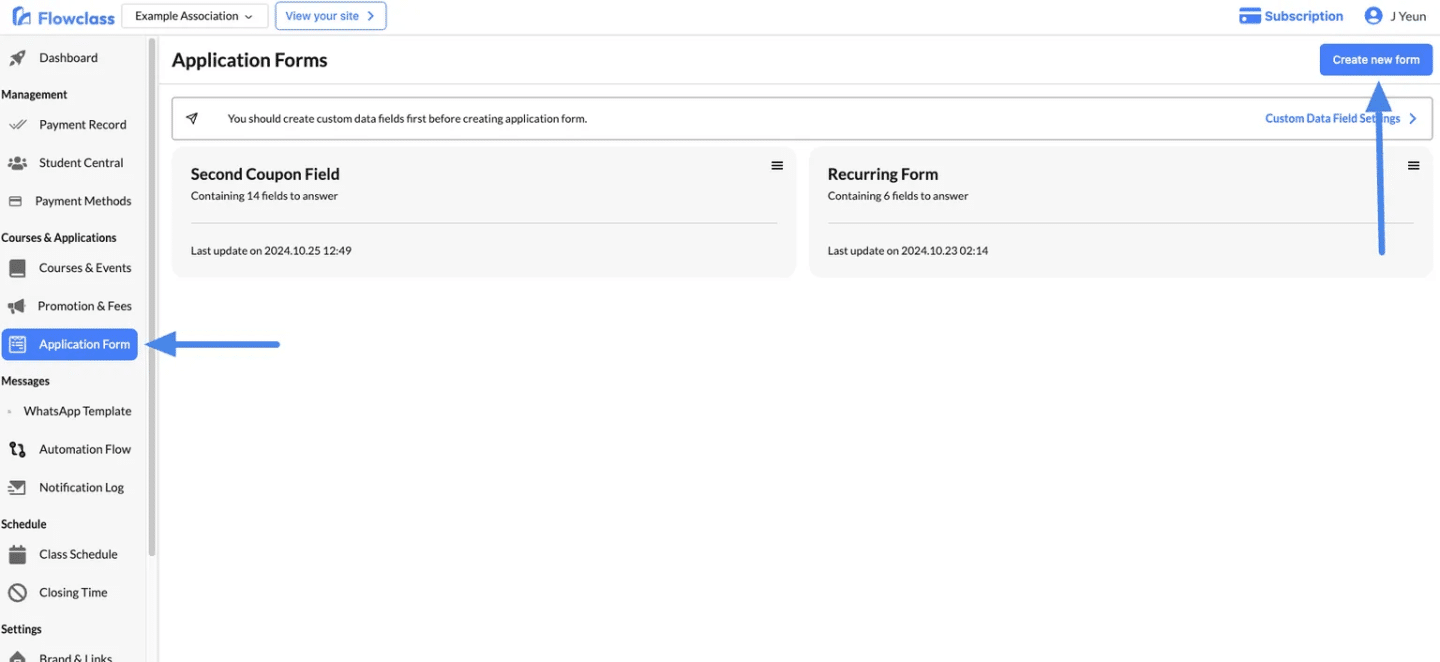
1. Accessing the Application Forms Section #
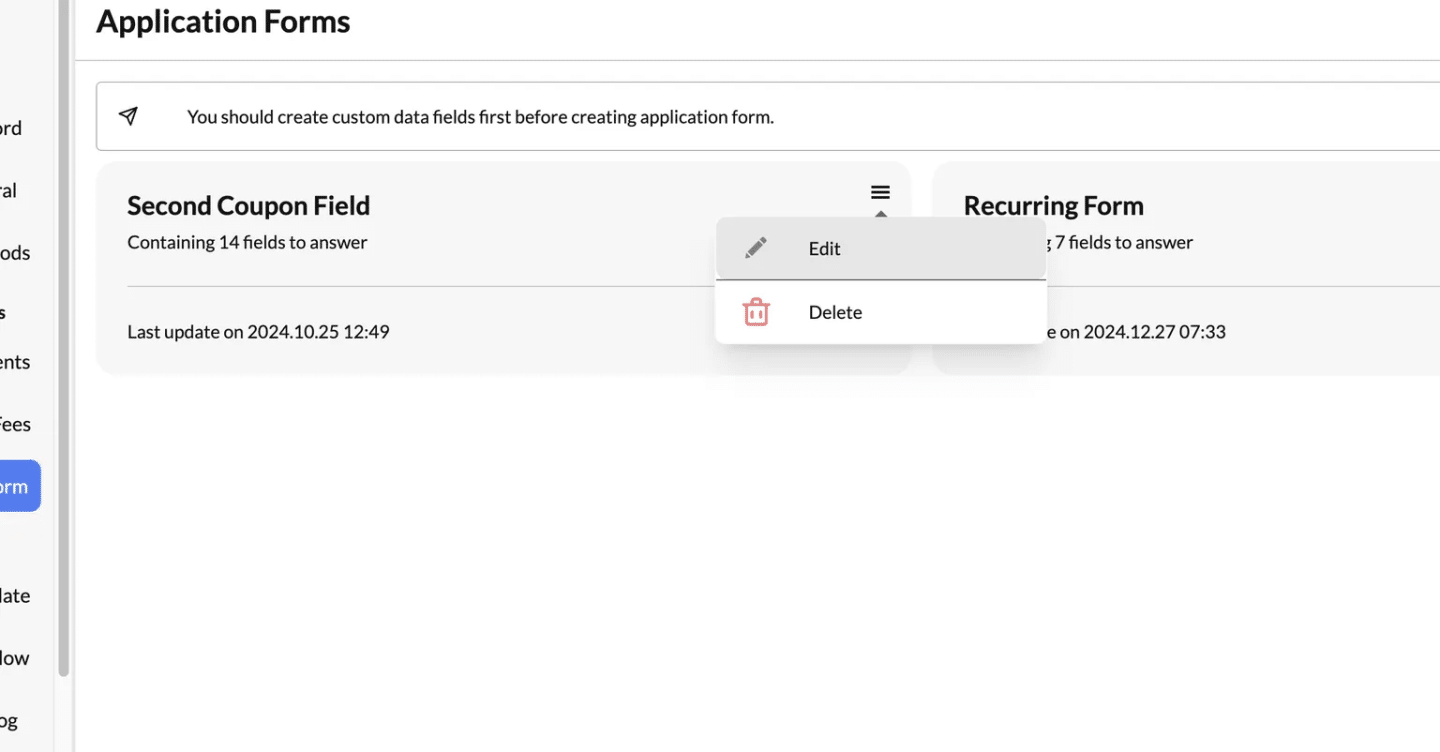
- Navigate to the Application Form section from the sidebar menu.
- You’ll see a list of existing forms (e.g., “Second Coupon Field” and “Recurring Form”) with their last update timestamps.
2. Creating a New Application Form #
- Click the Create new form button in the top-right corner to start building a new form.
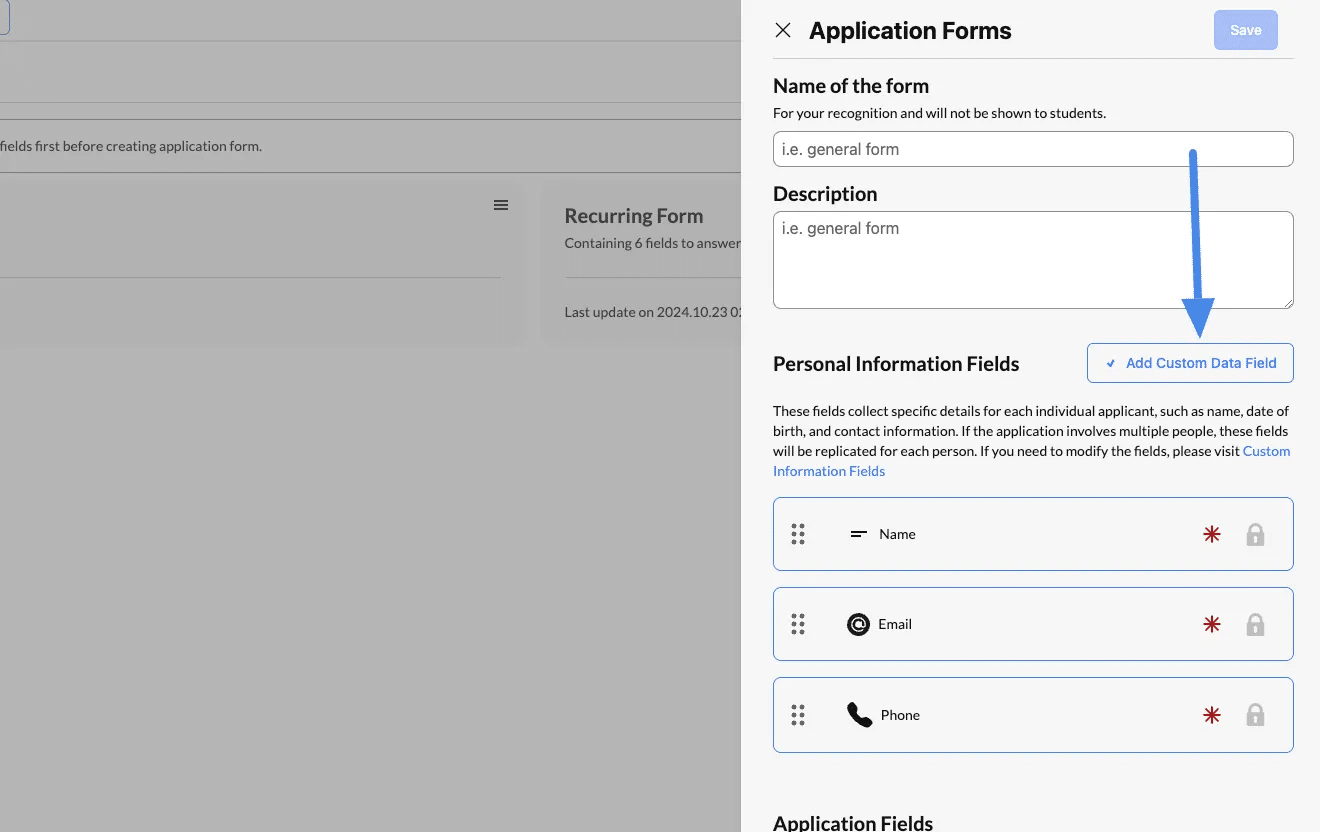
3. Configuring the General Form Details #
- Name of the Form:
- This is an internal label for your reference. It will not be visible to students.
- Example: “General Registration Form” or “Event Application Form.”
- Description:
- Add an optional description to provide details about the form’s purpose.

4. Select Custom Data Fields #
Use the Custom Data Field Settings option to create and manage reusable fields that can be added to multiple forms.
Please view Create Custom Data Fields to understand how to set up all the custom data fields you needed
5. Select Custom Data Fields #
- In the Custom Data Fields panel (as shown in the screenshot):
- Browse the list of previously created fields.
- Select the fields you want to include in your form by checking their boxes.
- Examples of fields might include:
- Short Answer for brief responses.
- Number for numerical inputs.
- Multiple Choice for predefined options.
- Date for date-specific inputs.
- Ensure you choose the fields relevant to your application process.
6. Different Types of Application Fields #
In most circumstances, all fields should be put into “Personal Information Fields”. All the data will be synced into the user’s record once the user completes the application process, and can be retrieved in the “Student Record” page.
A. Personal Information Fields
These fields are essential for collecting applicant-specific details. Some default fields include:
- Name: A required field locked by default.
- Email: A required field locked by default.
- Phone: A required field locked by default.
If you need additional personal data, you can:
- Click Add Custom Data Field to create new fields for unique requirements (e.g., Date of Birth, Address, etc.).
Only use “Application Fields” when you are allowing one user to register for multiple applicants, or when you don’t want some data to be synced to a user’s record. For example,
- Accepting Terms & Conditions
- Privacy Policies
B. Application Fields
Beyond personal information, you can add custom fields to collect additional application data. These fields may include:
- Dropdown Menus: For predefined options.
- Text Fields: For open-ended responses.
- Checkboxes: For multi-select options.
- File Uploads: For documents like resumes or certifications.
7. Organize Fields for Step 1 #
- Add the selected fields for the first step of the form. For example:
- Name
- Phone
- Arrange these fields in the desired order to create the first section of your form.
8. Saving and Using the Forms #
- Once the form is configured, click Save to make it available.
- Assign the form to specific courses, events, or memberships via the course settings.
Assigning Application Form to Course #
Find the course to be assigned to #
Assigning an application form to a course is a critical step to ensure that students can register seamlessly and provide the necessary information.
Without assigning a form, the course registration process will not function correctly. Follow these steps to assign an application form:
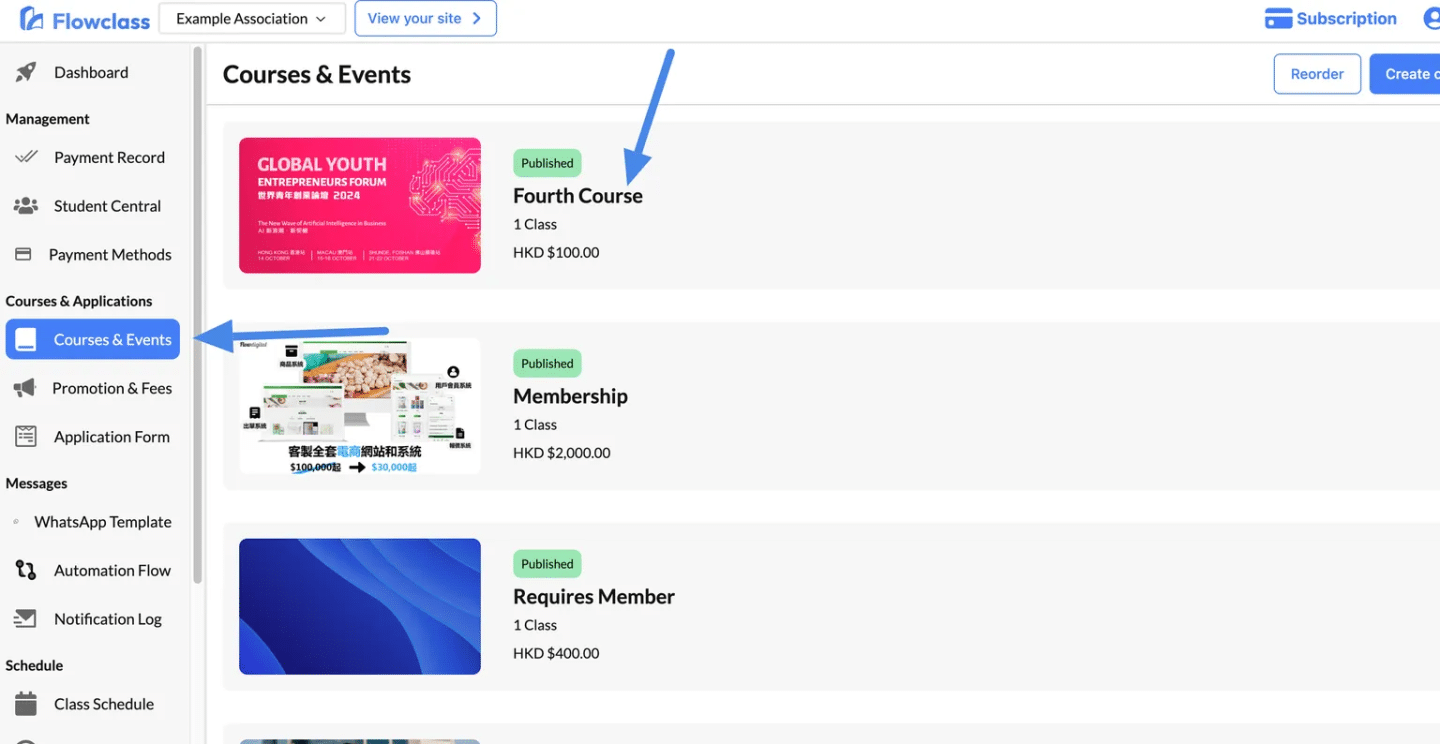
- Navigate to the Courses & Events section from the left-hand menu.
- Select the course you want to configure (e.g., “Fourth Course” as shown in the image).
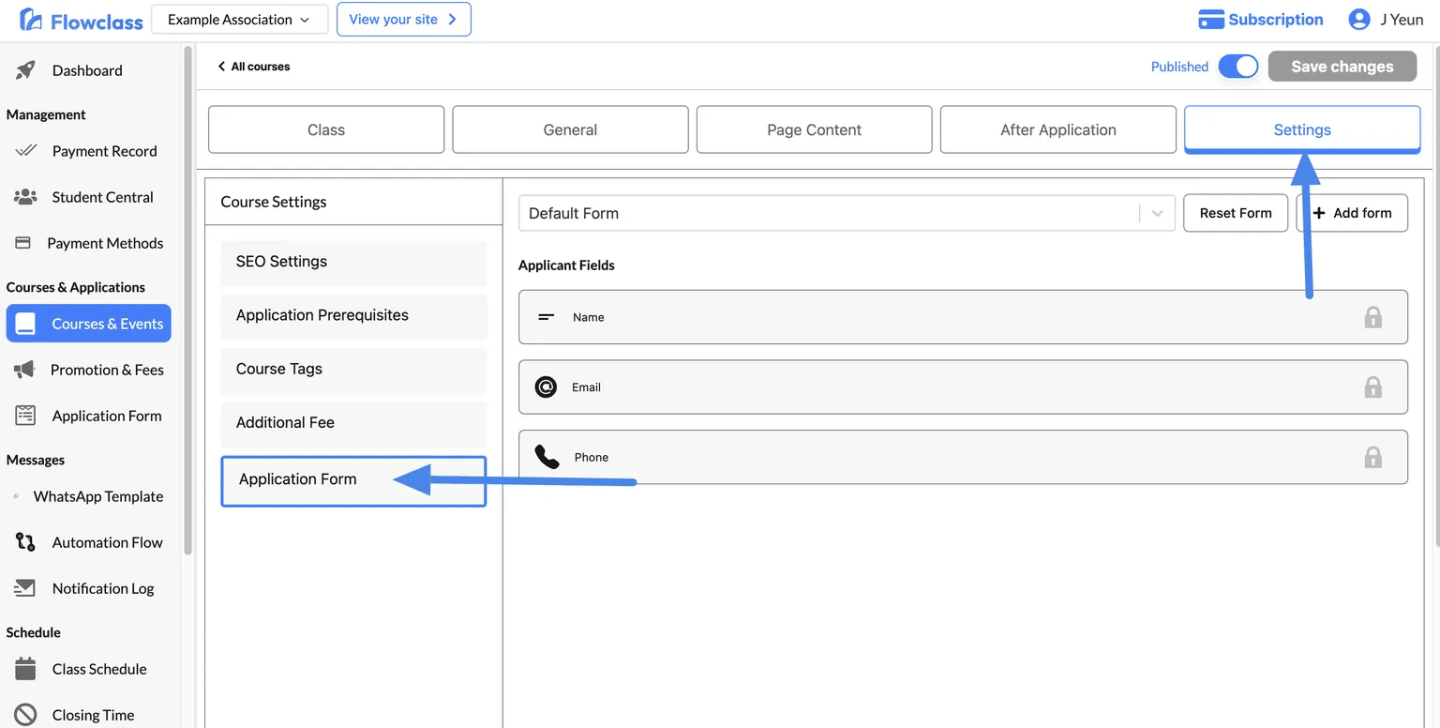
Access the “Settings” Tab:
- Open the course settings and click on the Settings tab at the top.
Select the Application Form: #
- Scroll down to the Application Form section.
- From the dropdown menu, choose an existing form (e.g., “Default Form,” “Recurring Form,” etc.).
- If you need a new form, click the Add Form button to create and customize a new one.
Save Your Changes:
- Once you’ve selected or created the form, click Save Changes at the top-right corner to apply the settings.
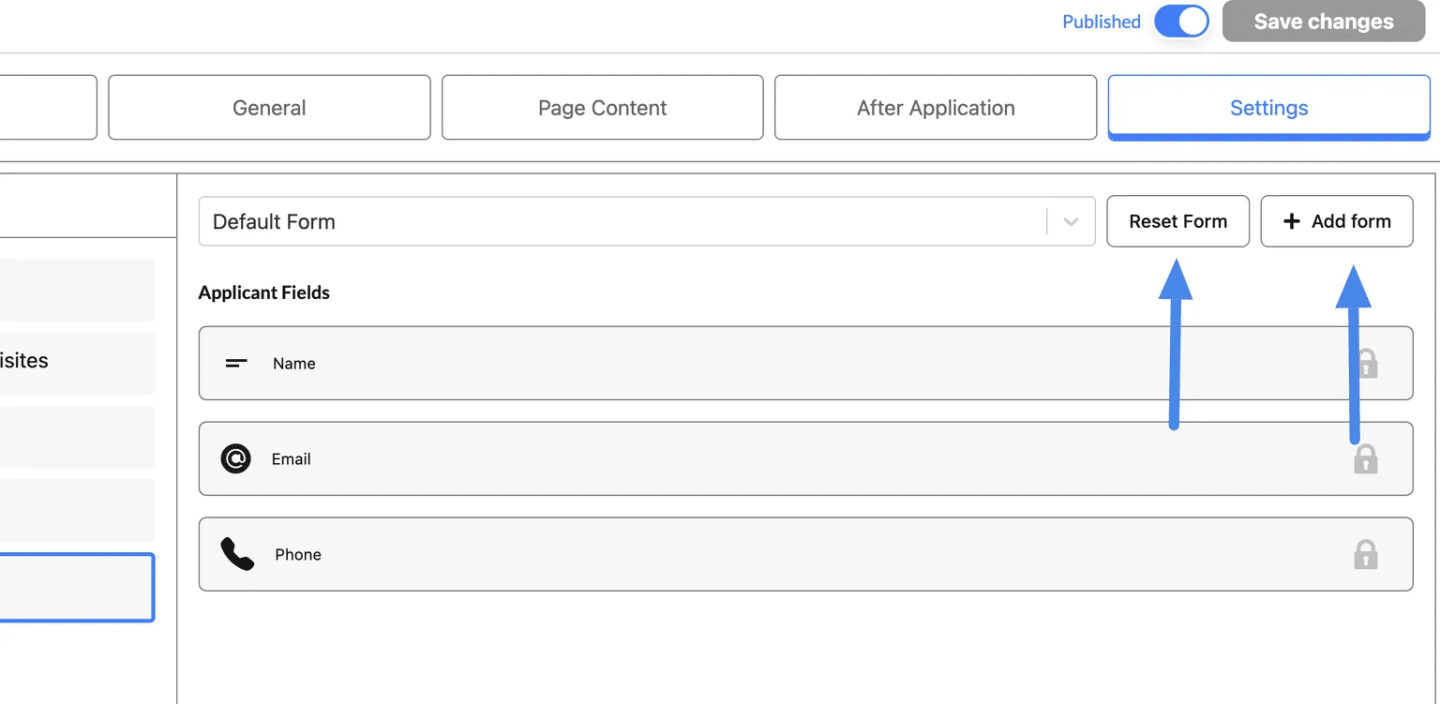
Reset & Add Form #
Reset Form
- Function: Reverts the current form to the Default Form.
- Default Form Fields: Includes only the basic fields:
- Name
- Phone
- Purpose: Use this option if you want to simplify the application form by removing all customizations and reverting to a standard form.
Add Form
- Function: Opens the Add Form page, allowing you to create a completely new custom form.
- Customization Options: On the Add Form page, you can:
- Add custom fields (e.g., address, preferences, or additional questions).
- Tailor the form to meet the specific requirements of your course.
- Purpose: Use this option to design a new form for unique data collection needs.
Edit & Delete Application Forms #
Steps to Edit a Form #
- Navigate to the Application Forms section in your Flowclass dashboard.
- Locate the form you want to edit (e.g., “Second Coupon Field” or “Recurring Form”).
- Click the menu icon (three dots) next to the form name.
- Select the “Edit” option from the dropdown menu.
- You will be taken to the form editor, where you can:
- Add, remove, or reorder fields.
- Adjust field settings (e.g., make a field required, change question text).
- Add or modify Step Separators to reorganize the form into multiple steps.
- After making changes, click Save to update the form.
When to Edit a Form
To update questions or fields based on new requirements.
To fix errors in existing forms (e.g., incorrect field labels).
To reorganize the form layout or steps for better usability.
Deleting an Application Form #
Steps to Delete a Form
- Go to the Application Forms section in your dashboard.
- Find the form you wish to delete.
- Click the menu icon (three dots) next to the form name.
- Select the “Delete” option from the dropdown menu.
- A confirmation dialog may appear to ensure you want to delete the form permanently. Confirm the deletion.
Important Notes About Deleting
- Permanent Action: Once a form is deleted, it cannot be recovered.
- Data Retention: Deleting a form will not erase the data already submitted through that form. Historical records will remain accessible in student profiles or submission reports.


