Custom data fields allow you to collect additional information from applicants when they fill out your application forms. These fields help tailor the form to your specific requirements.
Custom Data Fields: How to Set Them Up #
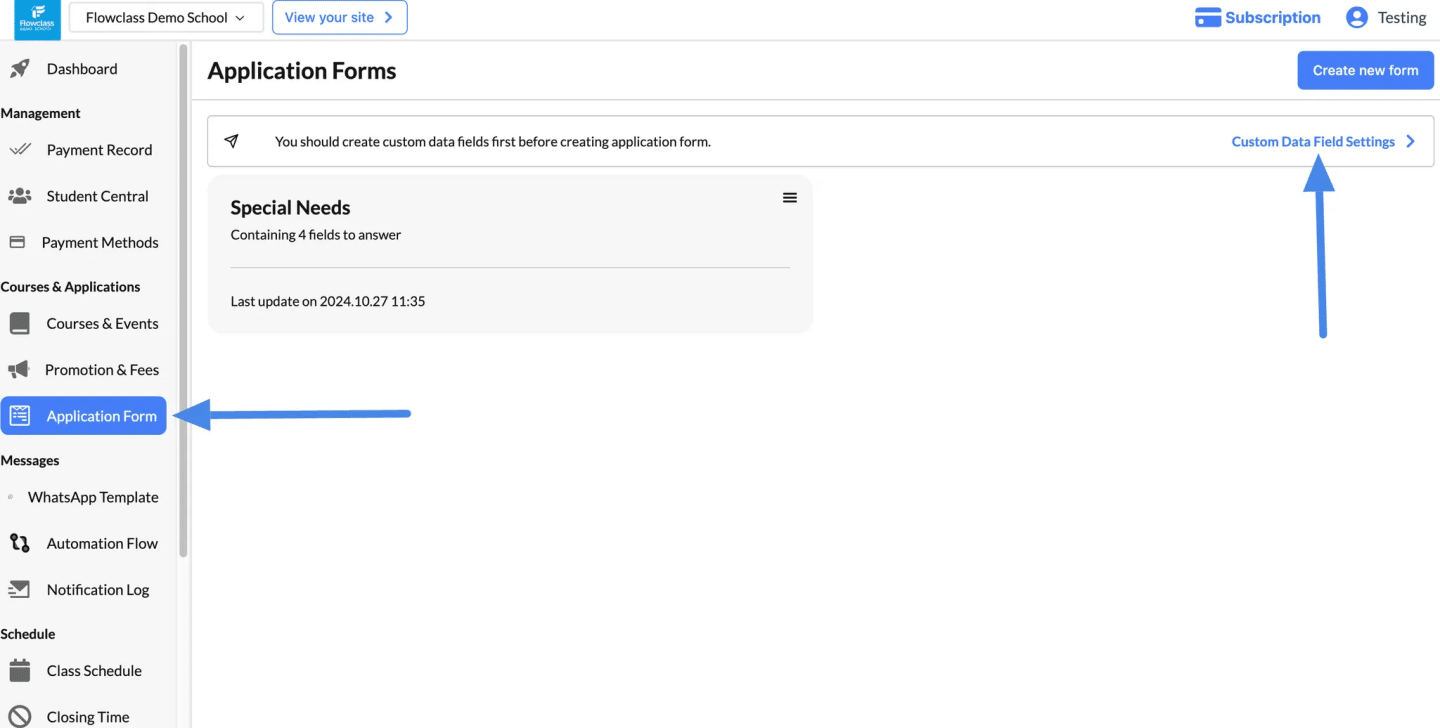
Step 1: Navigate to “Custom Data Field Settings” #
- Go to the Application Form section in your admin dashboard.
- Click on “Custom Data Field Settings” in the top-right corner of the page.
- This will take you to the page where you can create and manage custom fields.
Step 2: Create a New Custom Data Field #
- Click “Add New Field”:
- Add a new custom field to collect the specific information you need.
- Configure the Field Details:
- Field Name: Enter a descriptive name for the field (e.g., Dietary Preferences or Emergency Contact).
- Field Type: Choose the type of input you want, such as:
- Text (short or long)
- Dropdown
- Checkbox
- Radio button
- Date picker
- Placeholder Text (Optional): Add placeholder text to guide users on what to input.
- Required Field: Toggle this option on if the field must be completed.
Step 3: Access the Custom Data Fields Page #
- Go to the “Custom Data Fields” section by clicking “Custom Data Field Settings” in the Application Form menu.
Step 4: Click “Create New Field” #
- On the Custom Data Fields page, click the “Create new field” button in the top-right corner.
Field Types #
When creating a custom data field, you can choose from various field types depending on the information you want to collect. Below is a description of each field type:
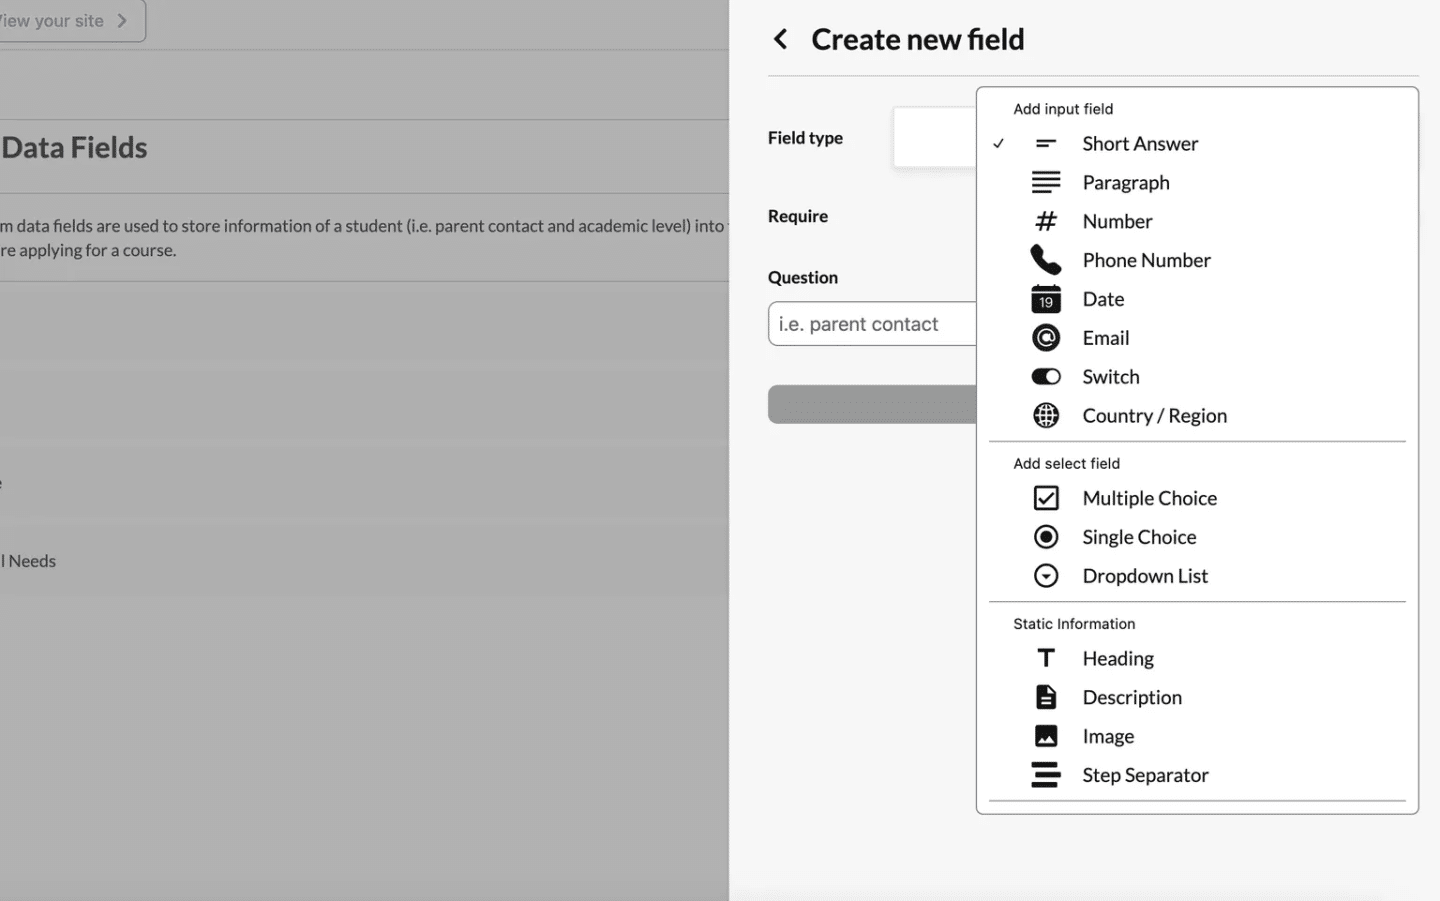
Input Fields #
These fields allow users to directly input text, numbers, or other data.
- Short Answer
- Description: A single-line text field for brief answers.
- Use Case: Names, titles, or short responses.Example: “What is your first name?”
- Paragraph
- Description: A multi-line text box for longer responses.
- Use Case: Collecting detailed information or feedback.Example: “Please describe any special needs or accommodations required.”
- Number
- Description: A numerical field for entering only numbers.
- Use Case: Collecting age, quantity, or ID numbers.Example: “Enter your age.”
- Phone Number
- Description: A field formatted specifically for phone numbers.
- Use Case: Collecting contact numbers.Example: “What is your phone number?”
- Date
- Description: A date picker field for selecting dates.
- Use Case: Birth dates, appointment dates, or event dates.Example: “What is your date of birth?”
- Description: A field that validates email addresses.
- Use Case: Collecting user email addresses.Example: “What is your email address?”
- Switch
- Description: A toggle switch for binary (yes/no) responses.
- Use Case: Simple confirmations or opt-ins.Example: “Do you have any allergies?”
- Country/Region
- Description: A dropdown menu for selecting countries or regions.
- Use Case: Collecting location-based information.Example: “Which country are you located in?”
Select Fields #
These fields allow users to choose from predefined options.
- Multiple Choice
- Description: Checkboxes for selecting one or more options.
- Use Case: Allowing multiple selections from a list.Example: “Which programs are you interested in? (Select all that apply)”
- Single Choice
- Description: Radio buttons for selecting only one option.
- Use Case: For questions with mutually exclusive answers.Example: “What is your preferred method of contact?”
- Dropdown List
- Description: A dropdown menu for selecting one option from a list.
- Use Case: Compact alternative to radio buttons, especially for long lists.Example: “Select your educational level.”
Static Information Fields #
These fields are for displaying content, not collecting input.
- Heading
- Description: A large text heading to divide sections.
- Use Case: Organizing forms into clear sections.Example: “Personal Information”
- Description
- Description: A text block for providing instructions or additional details.
- Use Case: Guiding users on how to fill out the form.Example: “Please fill out the fields below to complete your registration.”
- Image
- Description: Allows the inclusion of an image in the form.
- Use Case: Adding visual elements such as icons or banners.Example: Event logo at the top of the form.
- Step Separator
- Description: Divides the form into multiple steps or sections.
- Use Case: Simplifying long forms by breaking them into manageable parts.Example: Step 1: Personal Details, Step 2: Payment Information.
Pro Tips for Field Selection #
- Keep It Simple: Only use fields that are necessary to avoid overwhelming users.
- Use Placeholders: Add placeholder text to guide users on what to input.
- Test Your Form: Preview your form to ensure it is user-friendly and fields work as intended.
Example: Create a Custom Multiple-Choice Field #
A Multiple Choice field lets users select one or more options from a predefined list. Here’s how to create one and configure its options:
Step 1: Set the Field Type #
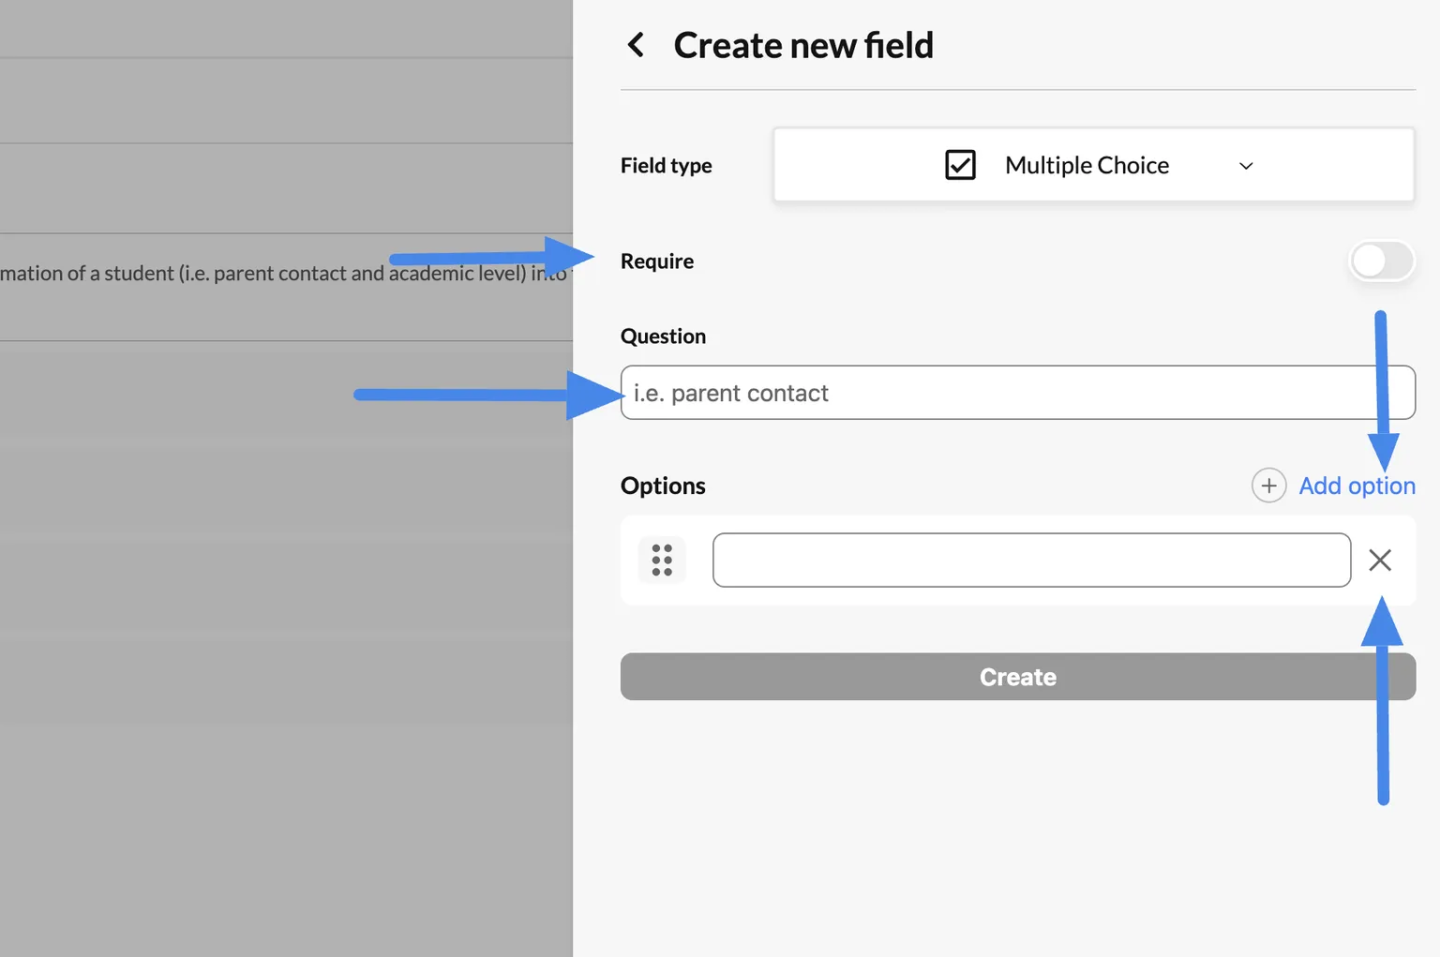
- In the “Create new field” window, select “Multiple Choice” from the Field type dropdown menu.
Step 2: Configure the Field #
- Require:
- Toggle the “Require” switch if this field must be answered before submission.
- Question:
- Enter the question or prompt for the field. Example: “Which programs are you interested in?”
- Options:
- Add multiple options for users to select from:
- Click “Add option” to add a new line for each choice.
- Enter the text for each option (e.g., “Program A”, “Program B”).
- Use the “X” button to delete unnecessary options.
- Rearrange options by dragging and dropping using the drag icon (three stacked dots).
- Add multiple options for users to select from:
Example 2: Create a Custom Image Field #
An Image field allows you to add an image, such as a logo, visual guidance, or a QR code, to your form. This field is static and does not collect input from users. Here’s how to create and configure it:
Step 1: Set the Field Type #
- In the “Create new field” window, select “Image” from the Field type dropdown menu.
Step 2: Configure the Field #
- Question:
- Enter a label or description for the image field. Example: “Scan the QR code below to join our WhatsApp group.”
- Upload an Image:
- Click the “Upload” button or drag and drop your file into the designated area.
- Supported uses:
- Upload a static image (e.g., event banners, logos).
- Add a QR code for easy access to a link or resource.Example: You can upload a QR code for a downloadable guide or a registration link.
Step 3: Save the Field #
- Once the image is uploaded and the field is configured, click the “Create” button to save the field.
Step 4: Add the Image Field to a Form #
- Go to the Application Form section in your dashboard.
- Add the newly created image field to your form.
- Place the image field in an appropriate section of the form to ensure it is easily visible.
Use Cases for Image Fields #
- Event Promotion: Add an event logo or banner to your form.
- Guidance: Include visual instructions or diagrams.
- QR Code: Provide easy access to additional resources, such as a payment page, registration link, or contact information.
- Branding: Reinforce your branding with a company logo.


