Skip to main content Skip to footer
  • Showcases
  • Pricing
  • Solutions
    • For Teaching Business
    • For Service-Based Business
    • For NGOs
  • Resources
    • Our Partners
    • Blog
    • Help Center
    • English
    • 繁體中文
LoginGet Started NowStart Automating
    • English
    • 繁體中文
  • Showcases
  • Pricing
  • Solutions
    • For Teaching Business
    • For Service-Based Business
    • For NGOs
  • Resources
    • Our Partners
    • Blog
    • Help Center
LoginStart Automating

Promotions

4
  • Assign coupon to the student
  • Create Coupons
  • Create Free Coupons
  • Add registration fee

Certificates

1
  • Creating a Certificate Template in Flowclass

Course Calendar

4
  • Course Calendar
  • Change & Delay Class
  • Mark Attendance
  • View & Change Student’s Lesson

Initial Set Up

6
  • Set Up Branding & Region
  • Set Up Home Page
  • Set Up Gallery
  • Set Up Contact Information
  • Set Up Social Media
  • Set Up Custom Domain

FAQ

2
  • FAQ – About Flowclass
  • What’s Flowclass?

Web Portal

2
  • Student’s Guide to Joining a Course
  • Completing Payments

Credit System

1
  • Add credit for a parent

Course Settings

4
  • Set Up Course Page & SEO
  • Set Up Sort & Filter for Courses
  • After-Application QR Code & Message
  • Set Up Terms & Conditions

Staff Management

2
  • How to delete account?
  • Hourly Rate Assignment

Class Types & Settings

6
  • Regular Class v2: Set Up Once, Repeat Forever
  • Choose the Right Type of Classes
  • Set Up Events (Paid & Free)
  • Set Up Regular Class
  • Set Up Recurring Class
  • How to update Class Quota in Flowclass?

Invoice Management

2
  • Assign Students’ Course by Create and Send Invoice
  • Invoice Reviewing

Custom Forms

6
  • Create Custom Data Fields
  • How to Create Custom Data Fields in Flowclass
  • Modify & Reorder Custom Data Fields
  • Create Application Form
  • Create Multi-Step Forms
  • Create a Membership Application Form

Payment Methods

2
  • Creating Payment Methods
  • Connect Stripe Online Payments

Application Records

3
  • Process Application Records
  • Filter Application Statuses
  • Export Data & View Analytics

WhatsApp & Email

5
  • Set Up WhatsApp Templates
  • Editing WhatsApp Templates
  • Use Your Logo in Emails
  • Re-Send Payment Notifications
  • Notifications Sent After Application

Automation

3
  • Customize Automation Flows
  • Adjust Student Notification Preferences
  • Notification Log

Integration

3
  • Embed Into Websites
  • Label Printing with Flowclass
  • Label Printing with Software

Subscription Plans

1
  • Check Subscription Payment Records

Student Management

4
  • The Student Central
  • Import & Add Student
  • Update Student Records
  • Changing the password for student accounts

Schedule Mangement

5
  • Closing Time
  • Assign Course to Student
  • Change Student’s Class
  • Assign Lesson To Student
  • Change Lesson Time & Status

Updates

1
  • Flowclass v2.1.0 Update
View Categories
  • Home
  • Flowclass Documentation
  • Custom Forms
  • Create Multi-Step Forms

Create Multi-Step Forms

2 min read

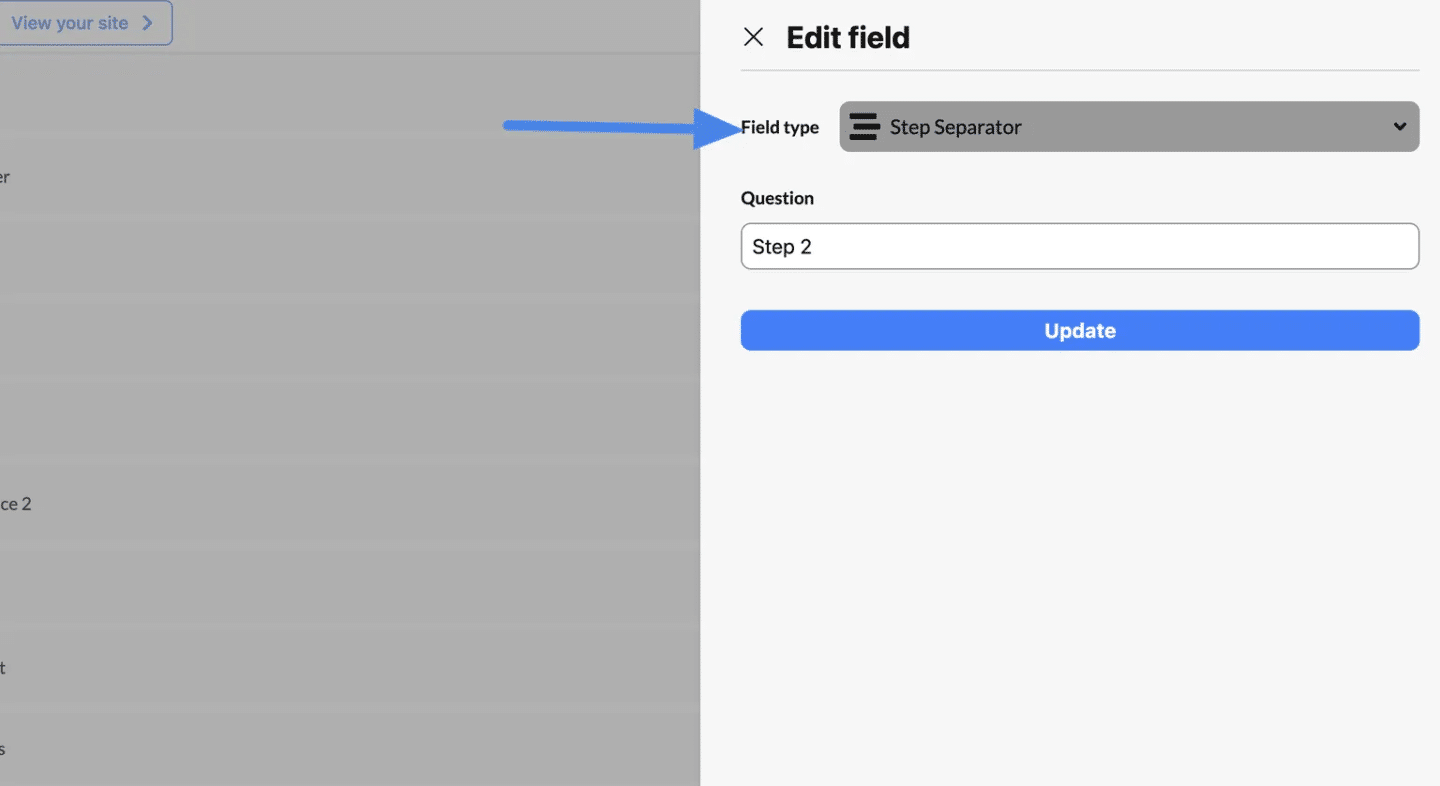
The Step Separator feature allows you to break a single form into multiple steps, creating a more user-friendly and organized application process. Here’s a step-by-step guide to creating a multi-step form using Step Separator.

Create a Step Separator #

Step 1: Navigate to “Custom Data Field Settings” #

  1. Go to the Application Form section in your admin dashboard.
  2. Click on “Custom Data Field Settings” in the top-right corner of the page.
    • This will take you to the page where you can create and manage custom fields.

Step 2: Create a New Custom Data Field #

  1. Click “Add New Field”:
    • Add a new custom field to collect the specific information you need.

Step 3: Create a Custom Data Field for the Step Separator #

  1. Navigate to the Custom Data Fields section in your Flowclass dashboard.
  2. Click the “Create New Field” button.
  3. In the Field Type dropdown, select Step Separator.
  4. Enter a descriptive name in the Question field. This name will appear as the title for the step (e.g., “Parent Information” or “Student Information”).
  5. Click the “Create” button to save the Step Separator.

Note: You can create multiple Step Separators if your form requires more than two steps.

Using the Step Separator #


The Step Separator is a special field type that divides your form into distinct sections or steps. Each step can contain a set of questions or fields, improving the usability of long forms by presenting them in manageable chunks.


Step 1: Access the Form Builder #

  1. Navigate to the Application Form section in your Flowclass dashboard.
  2. Click Create New Form (or edit an existing form).

Step 2: Select All Required Fields #

  1. A panel will appear listing all the available custom data fields. These fields have been previously created in the Custom Data Fields section.
  2. Carefully review the list and select all the fields you need for your form by checking the boxes next to them.

Step 3: Ensure Inclusion of Step Separators #

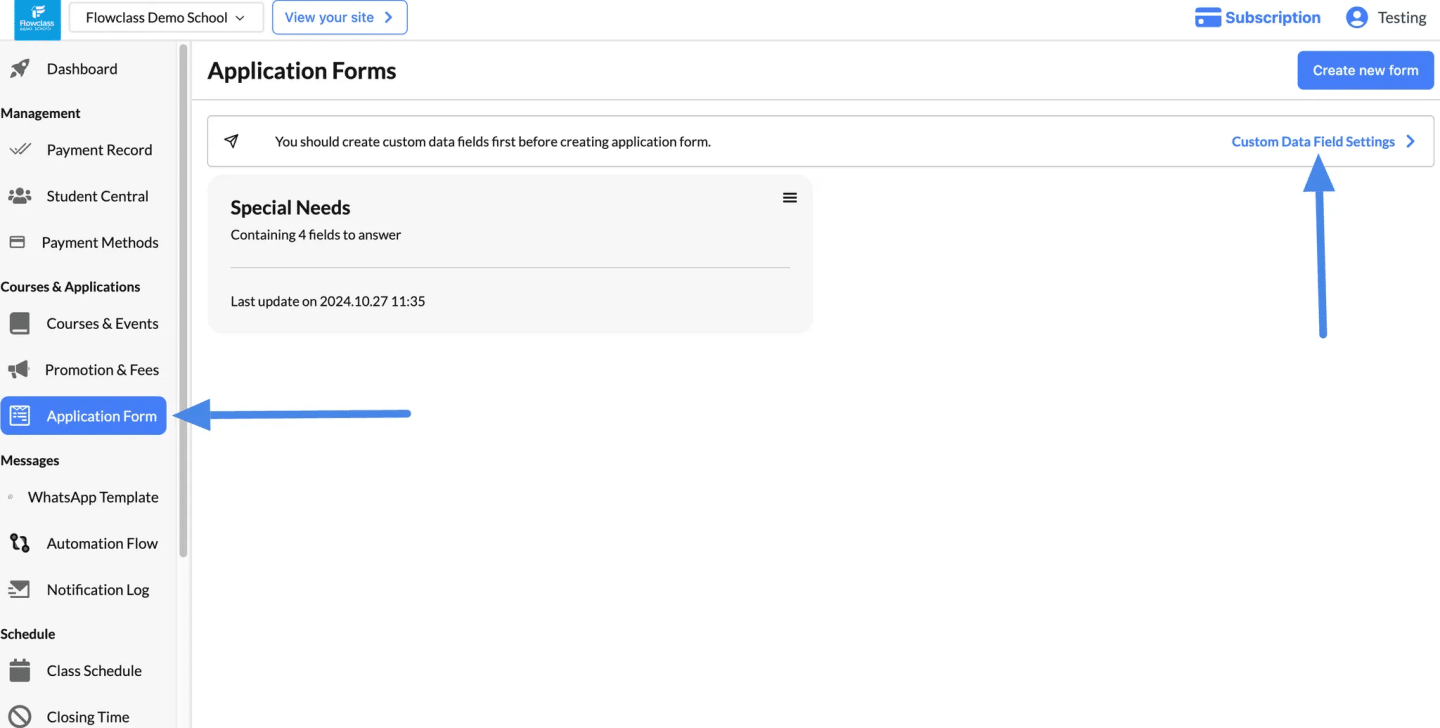
  • If your form is divided into multiple steps, ensure you select the Step Separator fields from the list. These fields are essential for breaking the form into logical sections and improving user experience.

Example Layout:

  • Step 1:
    • Email
    • Phone
    • Name
    • Short Answer
  • Step Separator (labeled as “Step 2”)
  • Step 2:
    • Phone Number
    • Single Choice

Step 4: Reorder Fields (If Necessary) #

  1. Use the Reorder feature to adjust the sequence of fields and separators.
  2. Drag and drop fields or separators to ensure each step is logically structured.

Step 5: Save the Form #

  1. Once all fields and steps are added, click Save to finalize the form.
  2. Test the form to ensure the steps are displayed as intended.

Example of a Multi-Step Form #

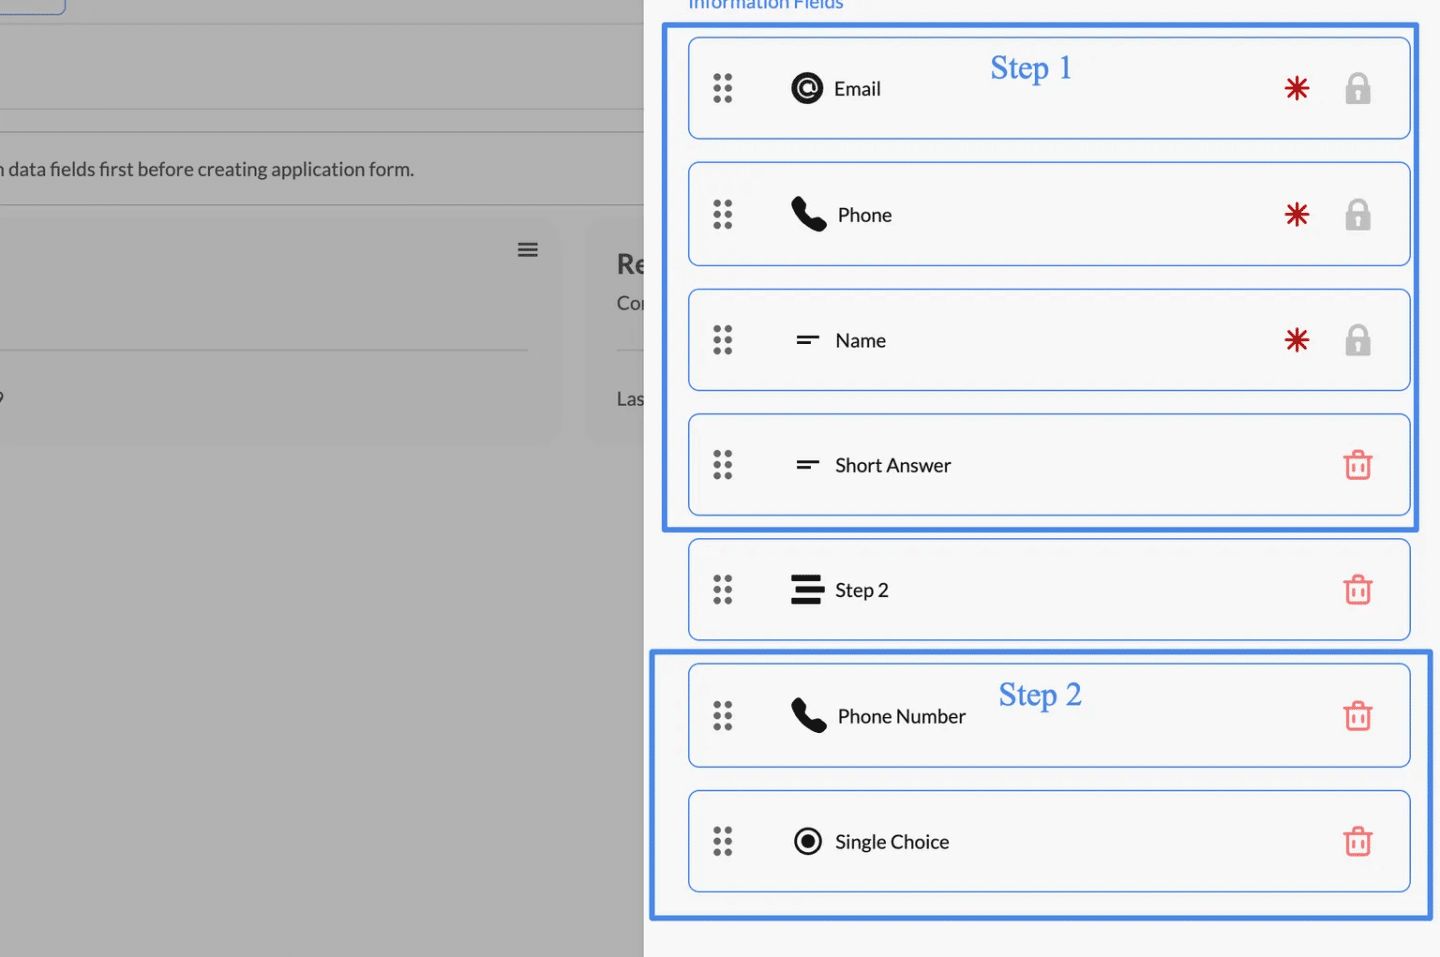
The Step Separator defines where one step ends, and the next begins, dividing the form into separate sections. Here’s an explanation of how the form is rendered based on the Step Separator logic:

Step 1: Initial Fields (Before the Step Separator) #

  • Fields Included:
    • Email
    • Phone
    • Name
    • Short Answer
  • The fields above the Step Separator are grouped into the first section of the application form.
  • Users are required to fill out these fields before they can proceed to the next step.

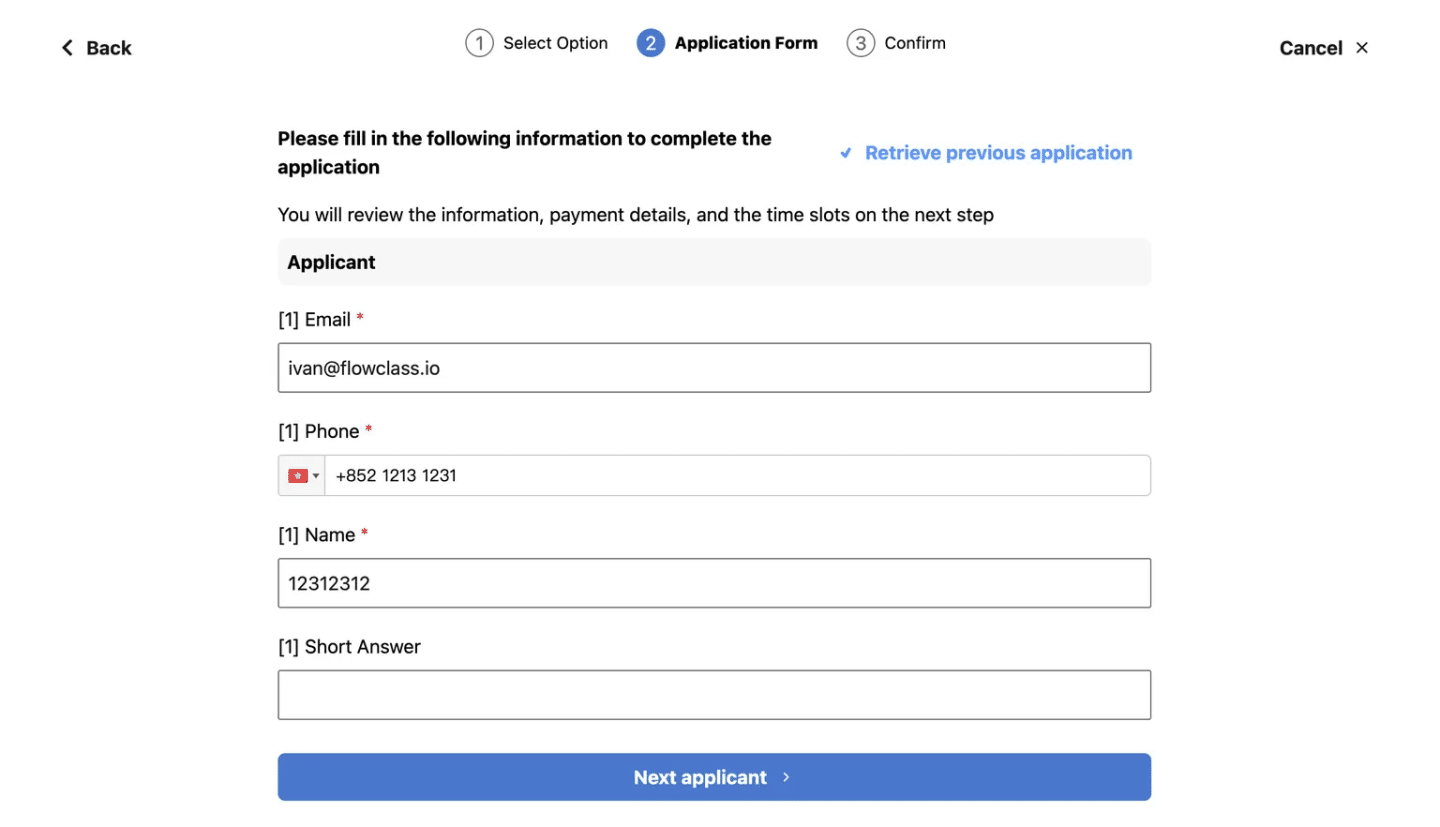
Displayed Features for Step 1:

  • A “Next” button at the bottom allows users to move to the next step once all required fields are completed.
  • The progress indicator at the top shows that the user is currently on Step 2: Application Form (the broader form section).

What Happens in Step 2? #

  • Fields Included:
    • Phone Number
    • Single Choice
  • The Step Separator creates a clear boundary, so these fields are displayed on a new screen or section after the user finishes Step 1.
  • This helps to logically separate the input process, ensuring a smooth transition between sections.

Displayed Features for Step 2:

  • A “Previous Applicant” button allows users to return to Step 1 if they need to edit any information.
  • A “Confirm” button is displayed at the bottom to finalize the application form once Step 2 fields are completed.

Final Outcome #

  • The form is organized into multiple steps based on the position of the Step Separator.
  • Each step is rendered as an independent section, with smooth transitions and clear instructions for the user.
  • The buttons and progress indicators ensure a logical flow from one step to the next, enhancing the overall user experience.
Updated on August 12, 2025

What are your Feelings

  • Happy
  • Normal
  • Sad

Share This Article :

  • Facebook
  • X
  • LinkedIn
  • Pinterest
Create Application FormCreate a Membership Application Form
Table of Contents
  • Create a Step Separator
    • Step 1: Navigate to "Custom Data Field Settings"
    • Step 2: Create a New Custom Data Field
    • Step 3: Create a Custom Data Field for the Step Separator
  • Using the Step Separator
    • Step 1: Access the Form Builder
    • Step 2: Select All Required Fields
    • Step 3: Ensure Inclusion of Step Separators
    • Step 4: Reorder Fields (If Necessary)
    • Step 5: Save the Form
  • Example of a Multi-Step Form
    • Step 1: Initial Fields (Before the Step Separator)
    • What Happens in Step 2?
    • Final Outcome
Ready to jump in?

Flowclass helps automate tedious tasks so educators can focus on what matters most – Teaching.

Get Started

Start streamlining student bookings and automating payment processes today with Flowclass!

感謝您的訂閱!

我們會送上最有效的學習情報🥰

Flowclass
  • Follow us on Facebook
  • Follow us on Instagram
  • Follow us on X
info@flowclass.io
+852 5722 5763
Flat 151 & 152, 15/F, Weswick Commercial Building, 147-149 Queen’s Road East, Wan Chai, Hong Kong

Solutions

  • Solutions
    • For Teaching Business
    • For Service-Based Business
    • For NGOs
  • Showcases

Resource

  • Flowclass Blogs
  • Help Centre
  • Recent Updates
Solutions
  • Solutions
    • For Teaching Business
    • For Service-Based Business
    • For NGOs
  • Showcases
Resource
  • Flowclass Blogs
  • Help Centre
  • Recent Updates

2025 © All rights reserved by Flowsophic Limited (Doing Business As Flowclass)