The Payment Records #
After logging in https://app.flowclass.io/student, you can see a list of courses that have been created. Simply click on the course which you want to check the student record, then you can see the list of applications as well as the status of payment.
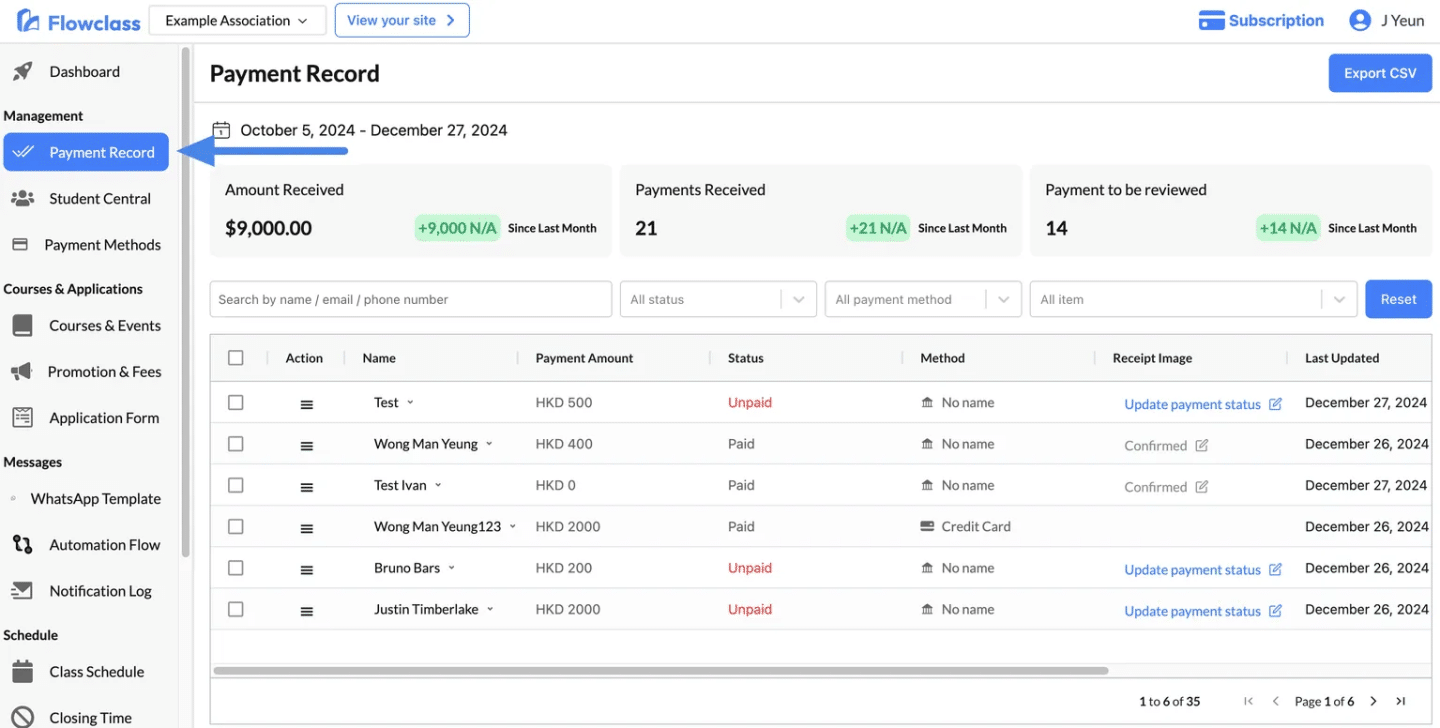
Step 1: Access the Student Record #
- Navigate to the Payment Record section from the left-hand menu.
- You will see a summary of:
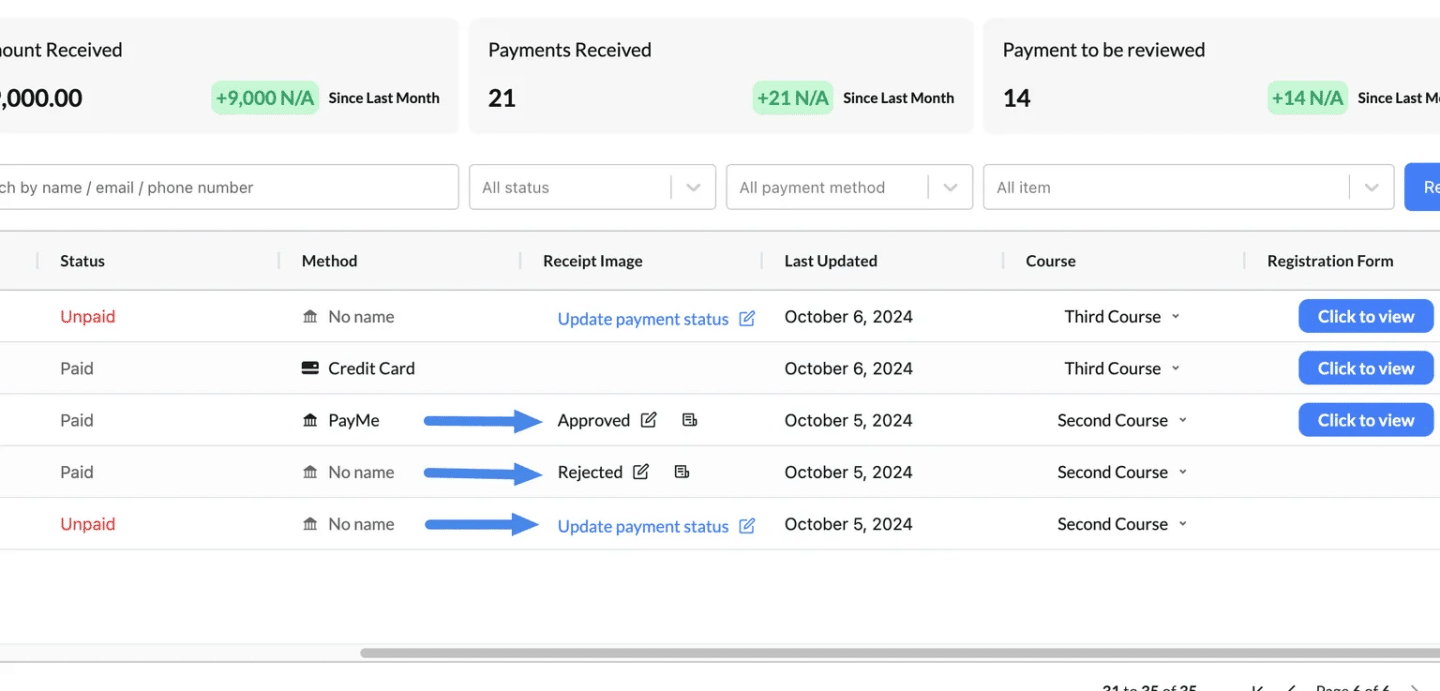
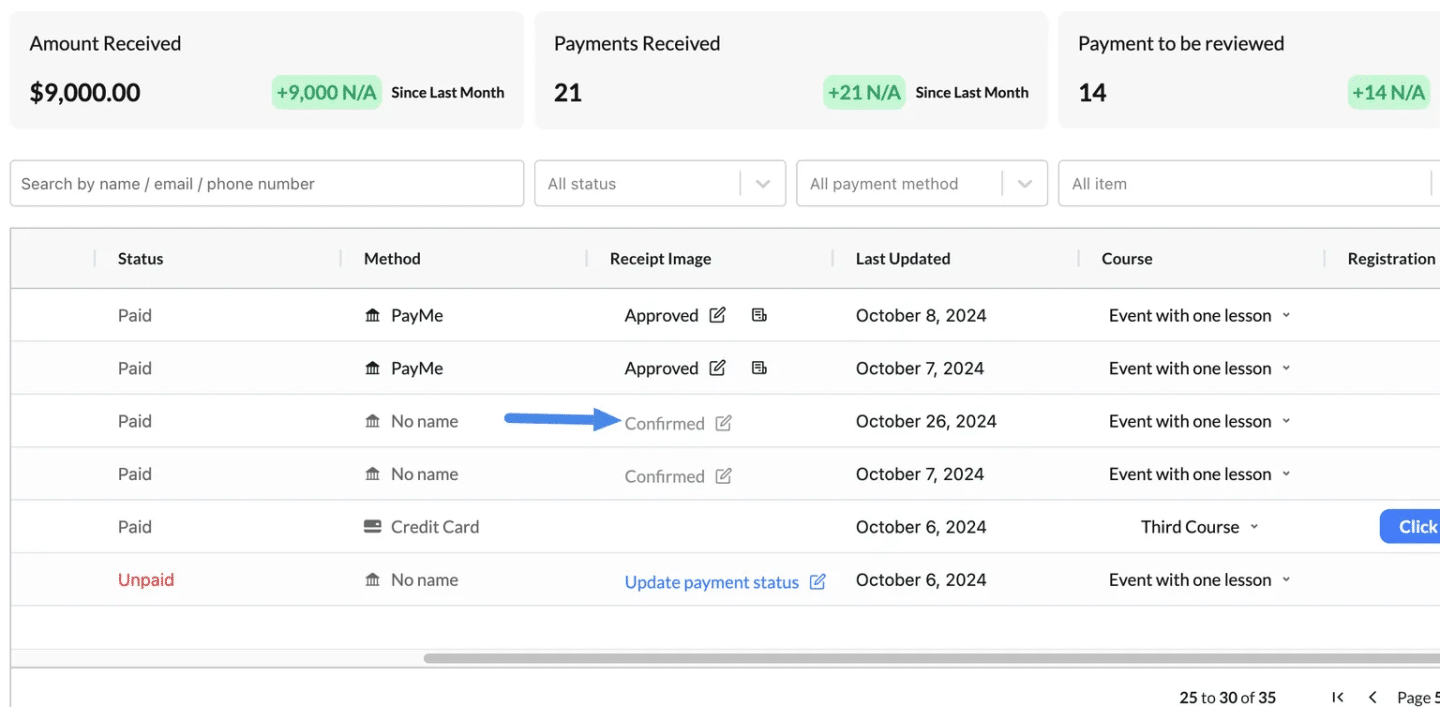
- Amount Received: Total payment collected during the selected period.
- Payments Received: Number of payments successfully processed.
- Payment to Be Reviewed: Payments that need verification or action.
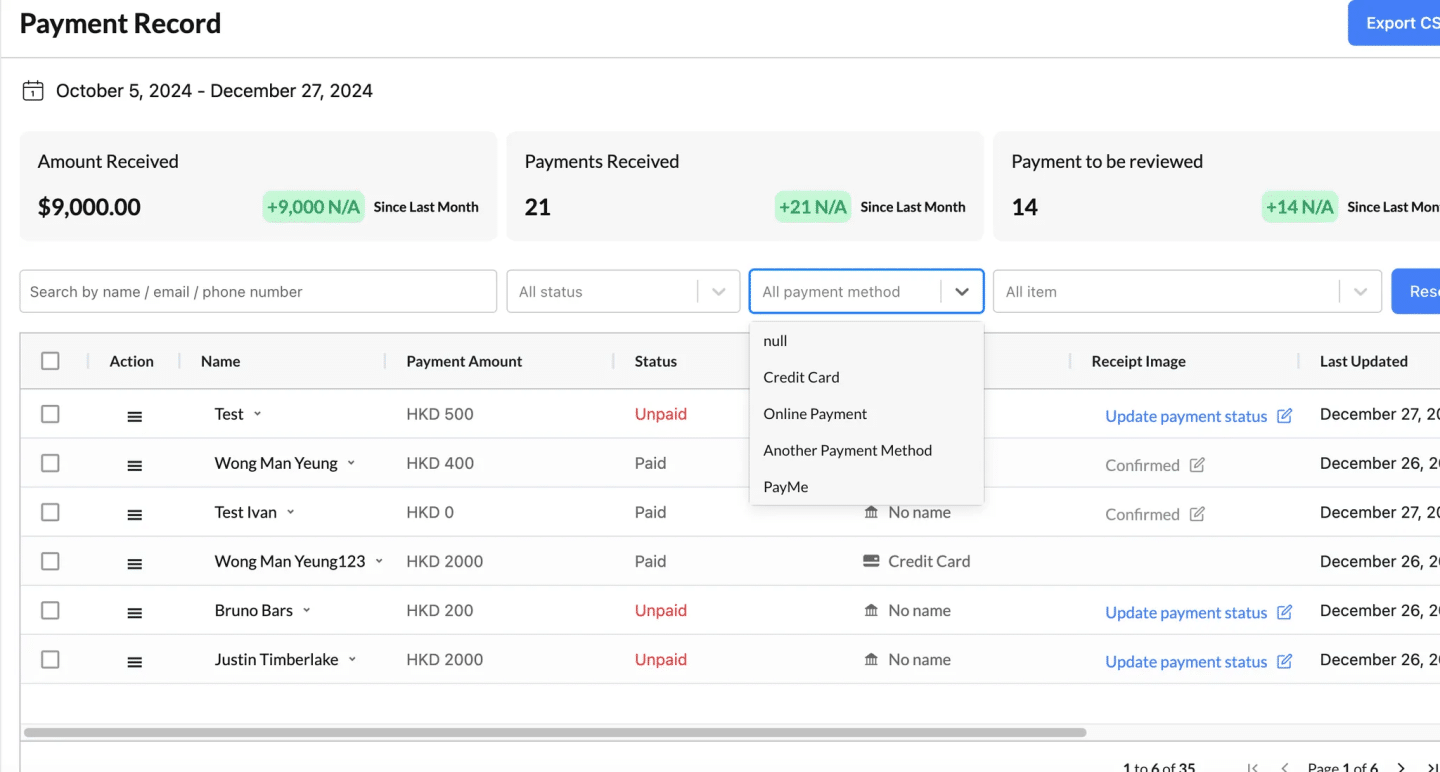
Step 2: Filter and Search Records #
You can refine the records displayed using the following options:
- Search Bar: Search by student name, email, or phone number.
- Filters:
- Status: Filter by payment statuses (e.g., Paid, Unpaid).
- Payment Method: Filter by methods such as credit card or bank transfer.
- Item: Filter by specific courses or memberships.
Click Reset to clear all filters and display the full list of records.
For how the payment filters work, please visit Filter Application Statuses to learn more.
Step 3: Review Payment Details #
- The table displays key details for each payment:
- Name: The student’s name.
- Payment Amount: The amount paid.
- Status: Indicates whether the payment is Paid, Unpaid, or needs review.
- Method: The payment method used (e.g., credit card, bank transfer).
- Receipt Image: If applicable, links to uploaded payment receipts.
- Last Updated: The last action taken on the payment.
Extra Information available for each record #
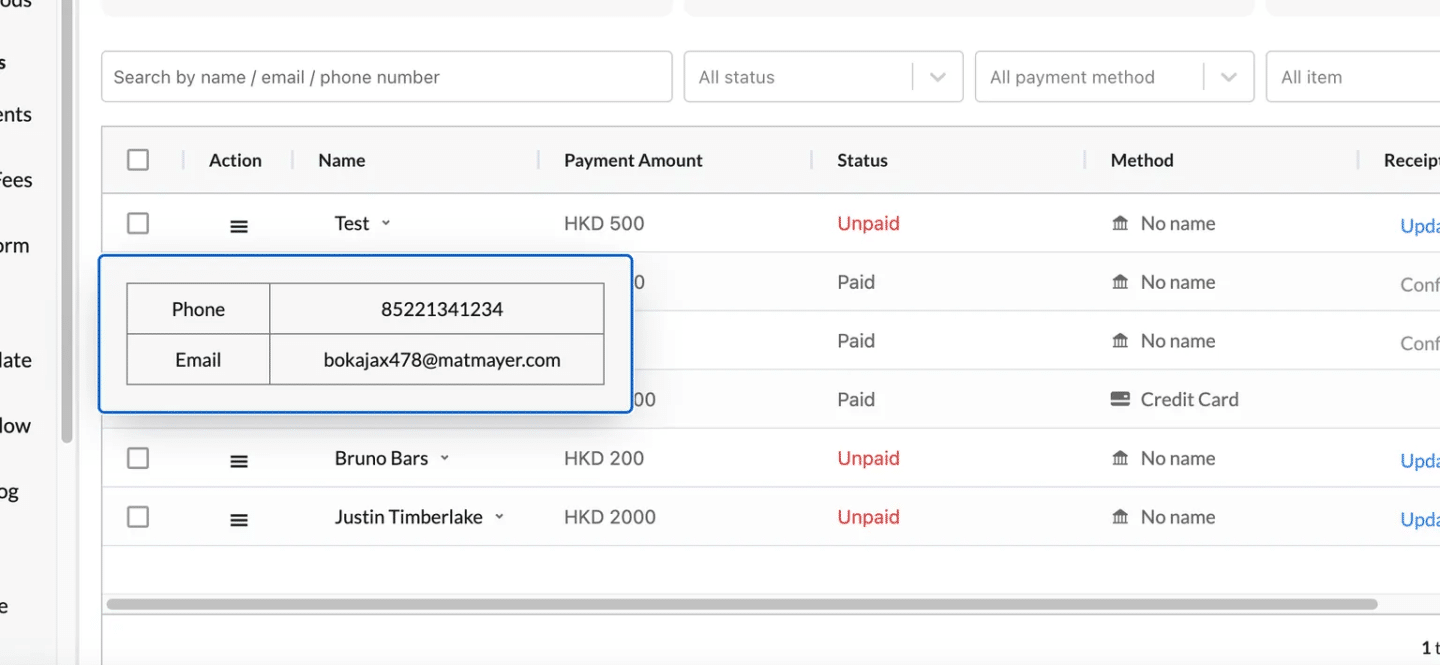
View Basic Information (Phone and Email)
- Purpose: Quickly access the student’s contact details for communication purposes.
- How to Use:
- Hover over the Name column in the Payment Record table.
- A small popup will appear, displaying:
- Phone Number: The student’s contact number.
- Email Address: The student’s registered email.
- Why It’s Useful:
- Enables quick communication when payment or registration issues arise.
- Makes follow-ups easier without navigating away from the screen.
Click to View Course
- Purpose: View the student’s applied lessons, payment details, and communication links.
- How to Use:
- Click the Click to View button under the Course column for a specific student.
- A detailed popup will appear, showing:
- Class Name: The class or course they’ve applied for (e.g., “Monday Class”).
- Lesson Schedule: Dates, times, and durations of all lessons (e.g., “2025/01/31 06:05 PM – 07:05 PM”).
- Payment Link: A clickable link for admins or students to view or process payment.
- WhatsApp Button: A button for instant communication with the student.

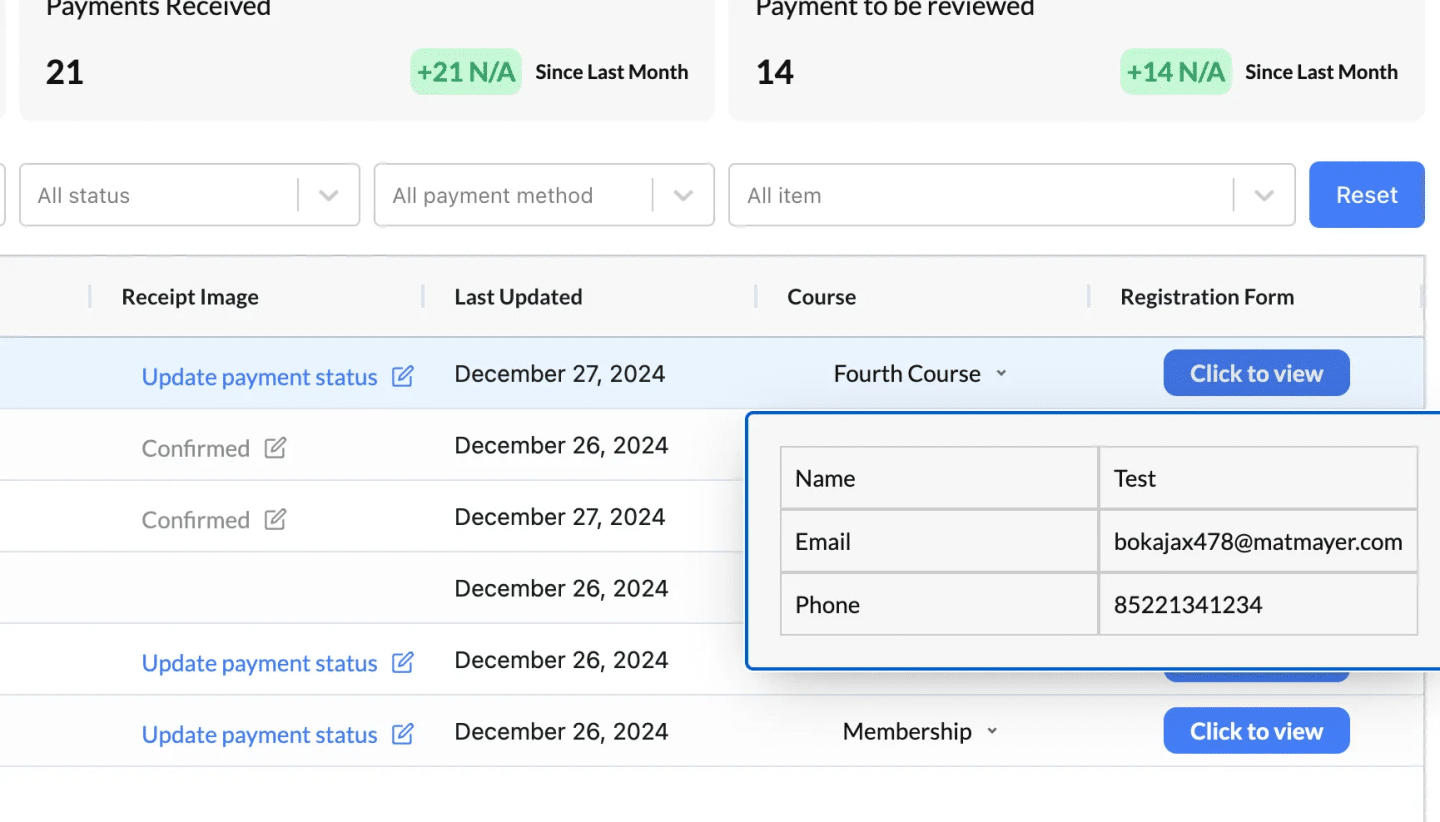
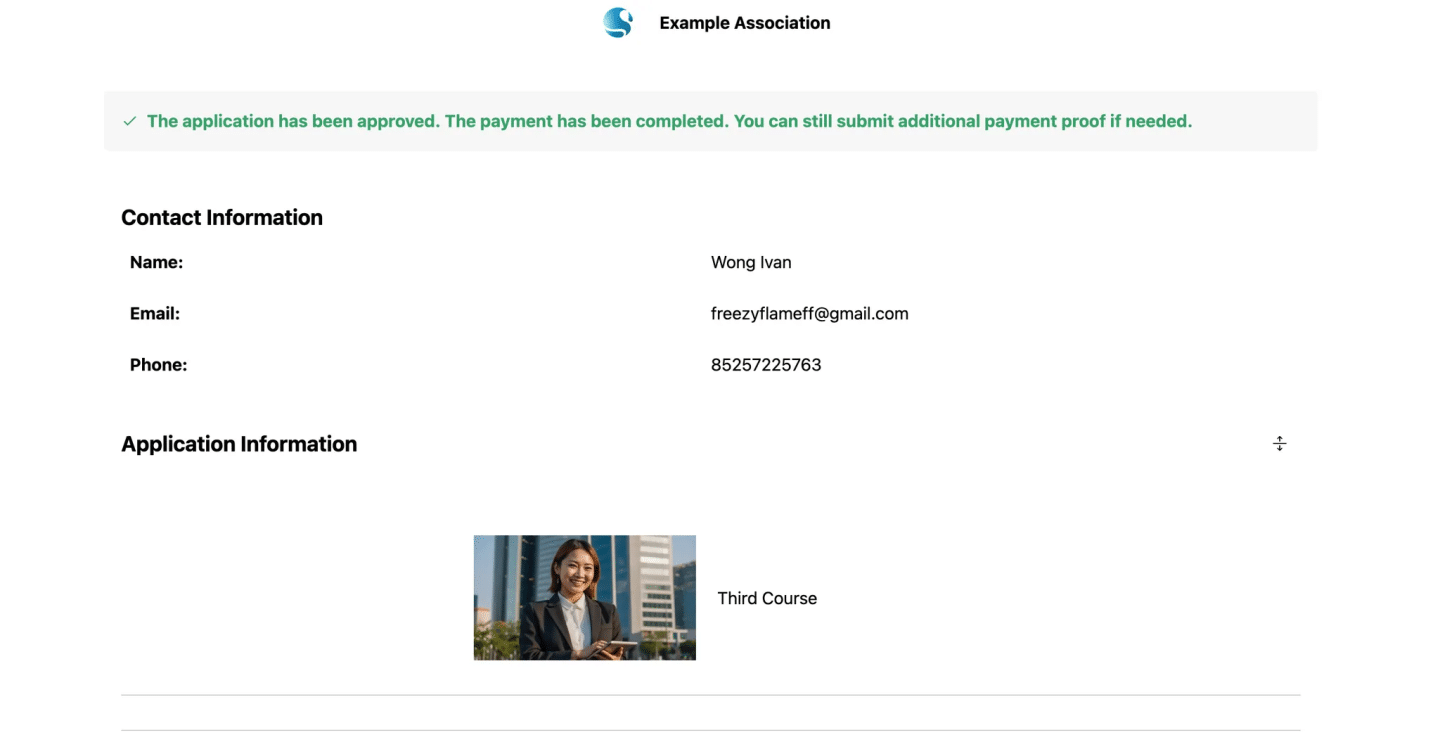
Access the Registration Form Popup
- Navigate to the Payment Record table.
- Locate the Registration Form column.
- Click the Click to View button for the desired student record.
- A popup will appear, displaying the student’s registration details.
Review Payment Records #
The Payment Status column in the Payment Record table reflects the payment progress of each student. Below is a detailed explanation of each button type, its purpose, and what happens when clicked.
The different payment statuses #
| Button Type | When It Appears | What It Does | Purpose |
|---|---|---|---|
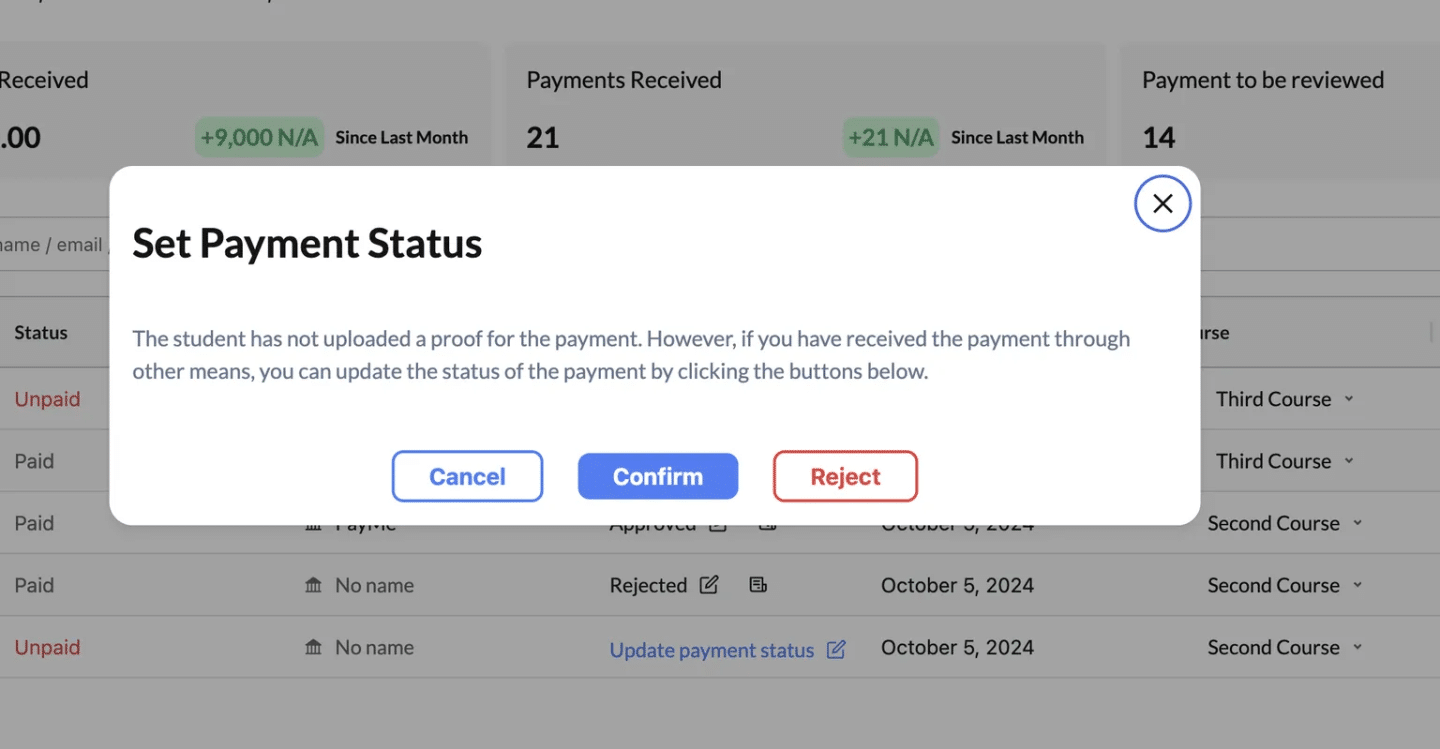
| Update Payment Status | Appears when a payment is listed as Unpaid and no payment proof has been uploaded. | Opens a popup allowing the admin to set the payment to Confirmed or Rejected. | Used to manually mark an unpaid payment as confirmed or rejected based on external verification. |
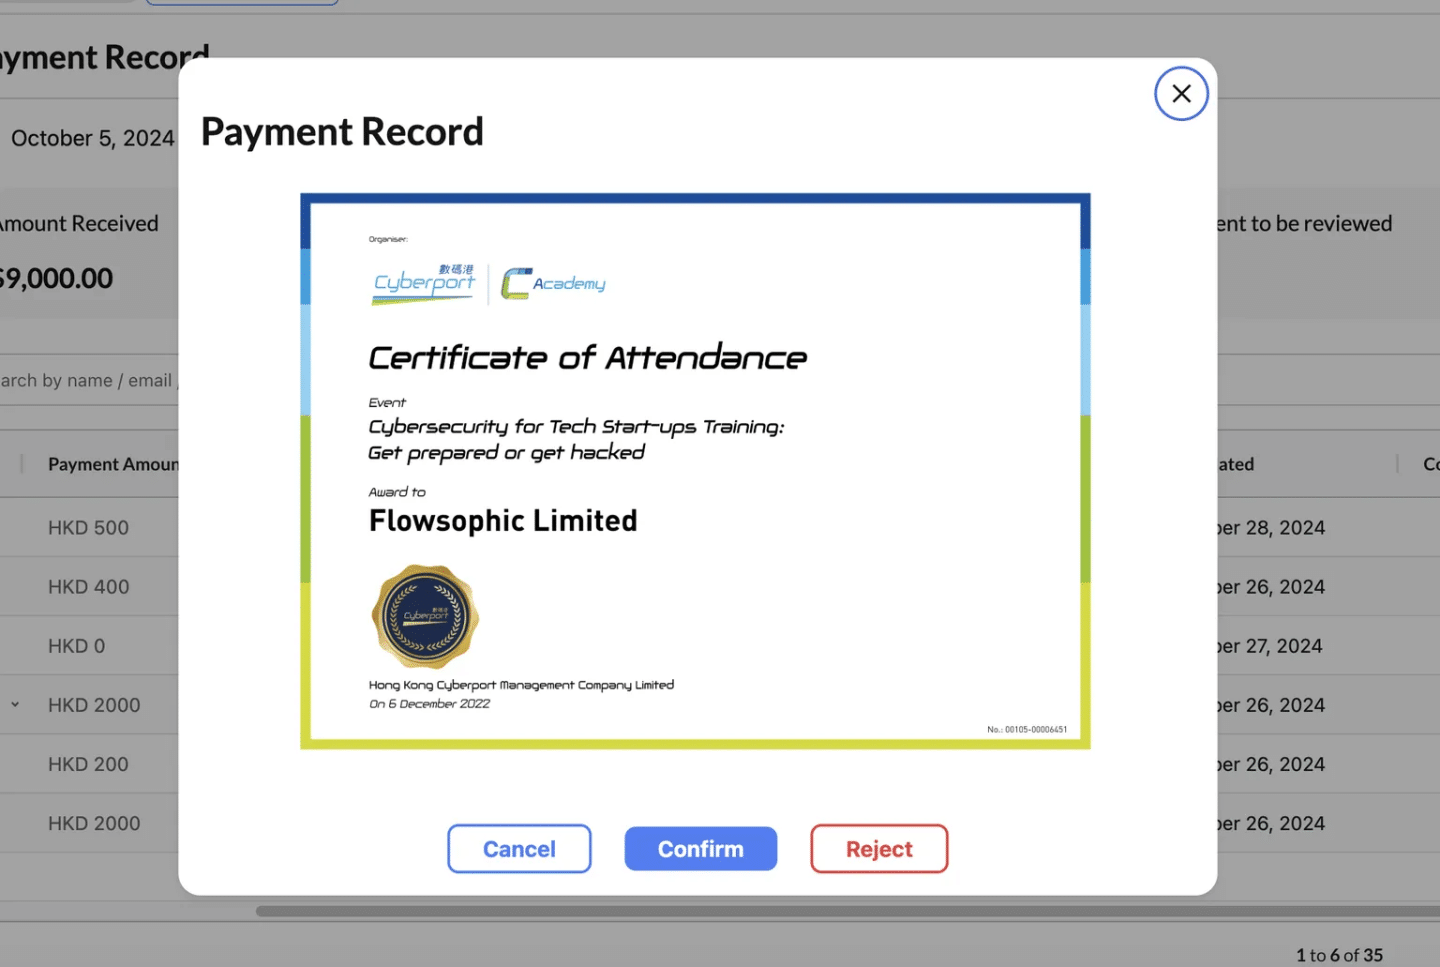
| Review Uploaded Proof | Appears when a student has uploaded a payment receipt but it hasn’t been reviewed yet. | Opens the uploaded proof (e.g., receipt image) for the admin to review, with options to Approve or Reject. | Allows admins to validate and process payments based on the uploaded payment evidence. |
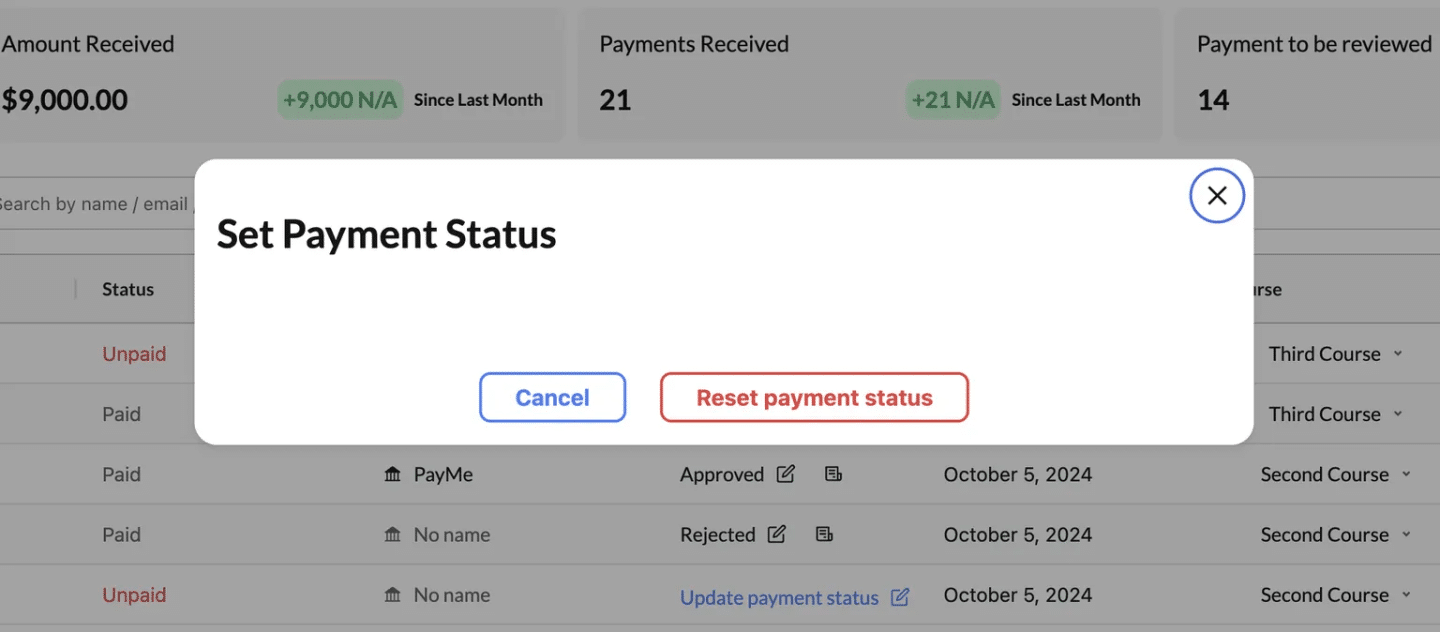
| Approved | Appears when a payment proof has been reviewed and approved by the admin. | Opens the approved receipt image for review, with an option to Reset Payment Status. | Confirms that the payment is verified and valid while allowing a reset if needed. |
| Rejected | Appears when a payment proof has been reviewed and rejected. | Opens the rejected receipt image for review, with an option to Reset Payment Status. | Indicates that the payment proof was invalid and rejected, while allowing the admin to reevaluate the status. |
| Confirmed | Appears when the admin manually marked the payment as confirmed (without requiring a receipt). | Opens a popup with an option to Reset Payment Status. | Confirms that the payment was verified via external methods, such as bank transfers or cash payments. |
1. Update Payment Status #
- Description: Used to manually update the status of an unpaid payment. No payment proof has been uploaded (as it might not be necessary).
- How It Works:
- Clicking this button opens the Set Payment Status popup with the following options:
- Confirm: Marks the payment as Confirmed.
- Reject: Marks the payment as Rejected.
- Cancel: Closes the popup without making changes.
- Clicking this button opens the Set Payment Status popup with the following options:
- Use Case:
- Use this button when no payment proof is uploaded, but payment is verified through external means (e.g., direct deposit or cash).
- Reject payments if the student fails to pay after a reminder.
2. Review Uploaded Proof #
- Description: Used to review and validate the payment receipt uploaded by the student.
- How It Works:
- Clicking this button opens the uploaded receipt for review.
- Admin options:
- Confirm: Marks the payment as Approved.
- Reject: Marks the payment as Rejected.
- Cancel: Closes the review process without making changes.
- Use Case:
- Use this button when the student uploads payment proof, such as a transaction screenshot or receipt.
- Approve valid proofs or reject invalid ones (e.g., incorrect amounts or fraudulent submissions).
3. Approved #
- Description: Indicates that the uploaded payment proof has been validated and approved by the admin.
- How It Works:
- Clicking this button opens the approved receipt for review.
- Admin options:
- Reset Payment Status: Reverts the payment status to Unpaid, allowing the payment to be reprocessed.
- Cancel: Closes the popup without making changes.
- Use Case:
- Use this button to confirm the validity of an already-approved payment proof.
- Reset the payment status if the approval was made in error or if the payment needs to be re-evaluated.

4. Rejected #
- Description: Indicates that the uploaded payment proof was reviewed and deemed invalid.
- How It Works:
- Clicking this button opens the rejected receipt for review.
- Admin options:
- Reset Payment Status: Reverts the payment status to Unpaid, allowing the payment to be reprocessed or reevaluated.
- Cancel: Closes the popup without making changes.
- Use Case:
- Use this button to revisit rejected proofs and verify if the rejection was accurate.
- Reset the payment status if a mistake was made during the initial review.
5. Confirmed #
- Description: Indicates that the payment was manually marked as confirmed without requiring an uploaded receipt.
- How It Works:
- Clicking this button opens a popup with the following option:
- Reset Payment Status: Changes the status back to Unpaid, allowing the payment to be reprocessed.
- Cancel: Closes the popup without making changes.
- Clicking this button opens a popup with the following option:
- Use Case:
- Use this button for payments verified through external methods (e.g., cash, direct bank transfer).
- Reset the payment status if the confirmation was made in error.
Workflow for Using Payment Buttons #
- Start with “Unpaid” Payments:
- Use Update Payment Status to confirm or reject payments based on external verification.
- If proof is uploaded, use Review Uploaded Proof to validate the payment.
- Handle Uploaded Proofs:
- Approve valid proofs using the Approve button.
- Reject invalid proofs using the Reject button and notify the student for corrections.
- Manage Approved or Confirmed Payments:
- For confirmed or approved payments, ensure the status is accurate.
- Use the Reset Payment Status button if corrections are needed.
- Track Rejected Payments:
- Use the Rejected button to review invalid proofs and decide if they need reevaluation.
- Reset the payment status if the rejection was done in error.
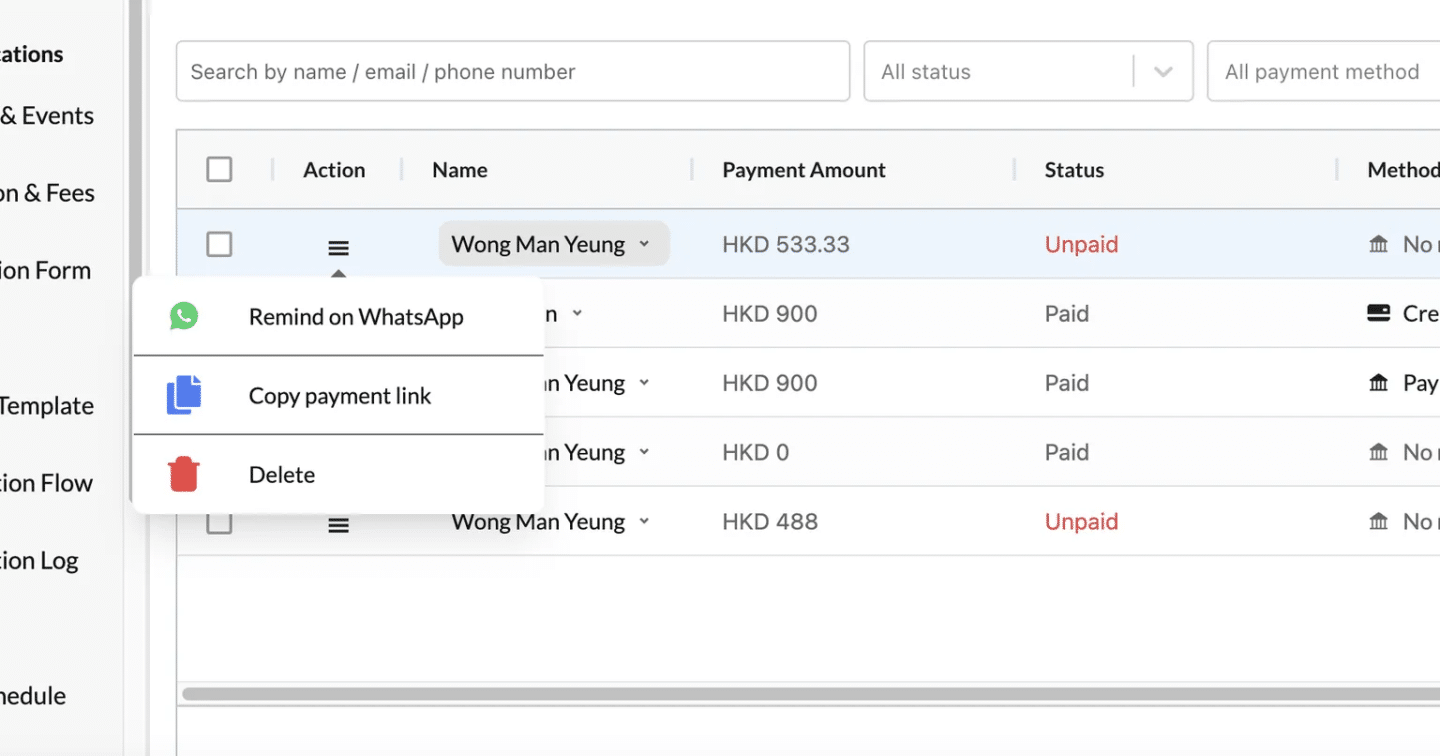
How to Access the Actions Menu #
- Navigate to the Payment Record table.
- Locate the Action column for the desired student record.
- Click the Action Menu Icon (three horizontal lines). A dropdown menu will appear with the following options:
- Remind on WhatsApp
- Copy Payment Link
- Delete
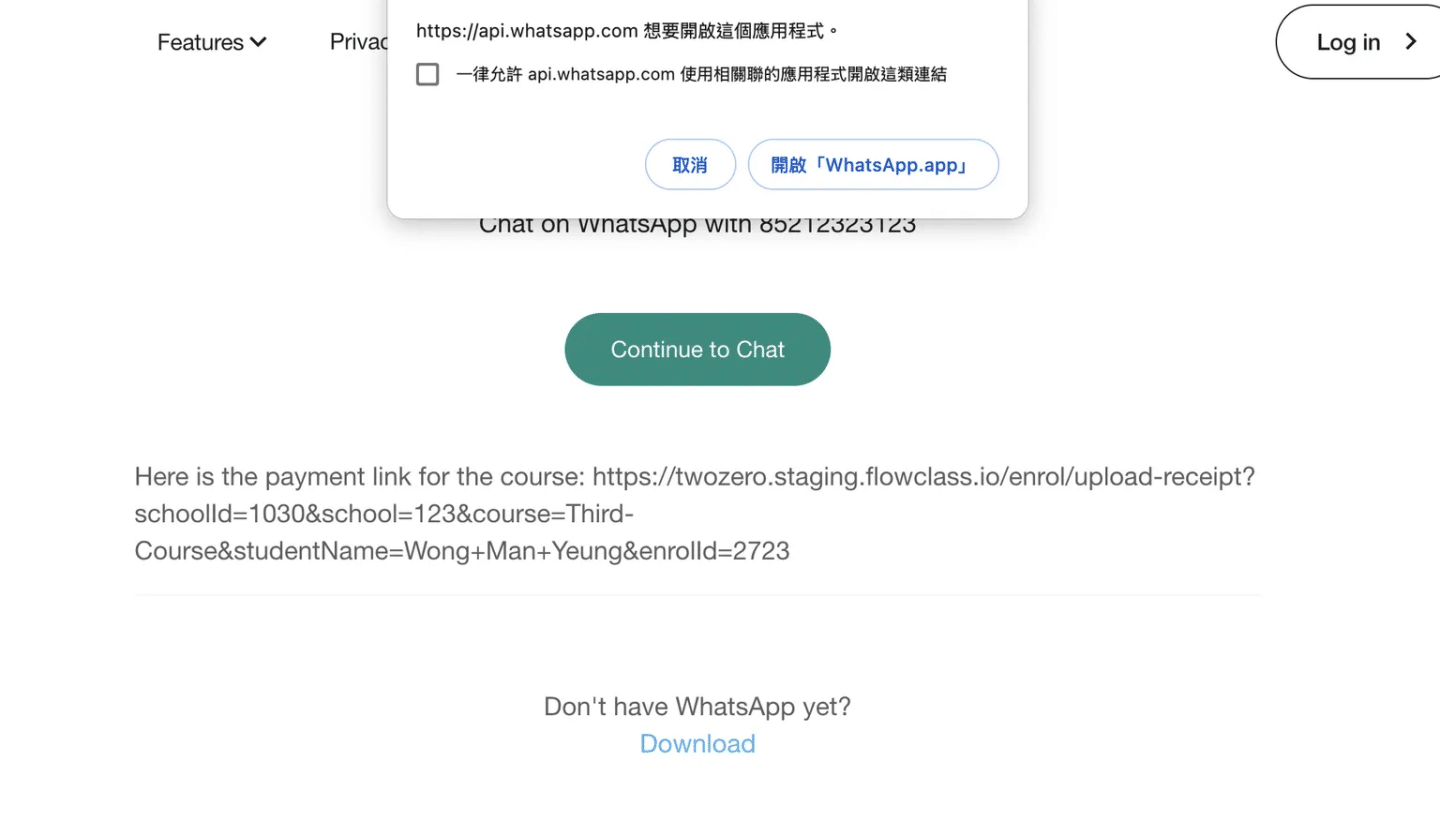
1. Remind on WhatsApp #
- Purpose: Sends a personalized payment reminder to the student via WhatsApp.
- How It Works:
- Click Remind on WhatsApp.
- WhatsApp opens (web or app, depending on your browser/device).
- A pre-filled message appears, typically including:
- The student’s name.
- A personalized payment reminder.
- The payment link for the course.
- Confirm and send the message to remind the student about their payment.
2. Copy Payment Link #
- Purpose: Copies the student’s unique payment link to your clipboard for easy sharing.
- How It Works:
- Click Copy Payment Link.
- The payment link is automatically copied to your clipboard.
- Paste the link into an email, text message, or any other communication tool to share it with the student.
3. Delete #
- Purpose: Permanently removes the selected payment record from the system.
- How It Works:
- Click Delete.
- A confirmation prompt will appear to ensure the record is deleted intentionally.
- Confirm the action to delete the record.
- Important Note:
- Deleted records cannot be recovered, so double-check before confirming deletion.


