Preface: Why We Changed Regular Class Setup #
In previous versions, creating a regular class required you to manually set up every single lesson time slot. While this offered flexibility, it was time-consuming and prone to errors—especially for ongoing courses or classes with consistent weekly/monthly schedules.
Regular Class v2 introduces a smarter, more structured way to build repeating schedules. Now, you can define a pattern once, and the system will automatically generate all the future time slots for you. This shift makes it easier to manage long-running classes, reduces setup mistakes, and gives you powerful tools for handling holidays, makeups, and pricing.
When & Why to Use Regular Class v2 #
Use Regular Class v2 when:
- All students start and end together.
This class type is ideal if your group runs in fixed cycles—such as monthly sessions, school terms, or any schedule where everyone progresses as a cohort from beginning to end. - Your class follows a repeating pattern.
For example, lessons happen every Wednesday at 10:00, or on the 1st and 3rd Saturday each month. - You want to minimize admin work.
Instead of adding each lesson manually, set up a single pattern and let the system generate all future lessons for you—whether for a set period or ongoing. - You need to handle holidays, closures, makeups, or flexible pricing/enrollment rules.
Do NOT use Regular Class v2 if:
- Each student has a unique start or end date, or if students join and finish at different times (consider using “Recurring” or “Appointment” class types for flexible start/end requirements).
- Every session is unique without an overall pattern (use “Event” or “Appointment” instead).
2. Advantages Over the Previous System #
- Set up once, repeat forever: No need to manually add each lesson.
- Supports infinite or fixed periods: Create ongoing classes, or limit to a set number of months/weeks.
- Easy adjustments: Edit, skip, or add lessons with one click—system tracks all overrides for you.
- Handles holidays & closures: Automatically blocks out public holidays or days your institution is closed.
- Flexible student selection: Control whether students must enroll for a whole period, start mid-period, or pick individual lessons.
- Consistent pricing: Supports both period-based and per-lesson pricing, with advanced options for packages.
3. How Does Regular Class v2 Work? #
A. Key Concepts #
- Class Schedule Pattern: Defines how often lessons repeat (by day, week, or month), on which days, and at what times.
- Number of periods: Organizes lessons into periods (e.g., 1 month per period) and controls how many periods are generated (fixed or infinite).
- Date Overrides: Lets you add, skip, or move specific dates.
- School Closures: Automatically blocks lessons on scheduled closure dates; these are highlighted in the preview.
- Selection Modes: Controls how students can enroll (entire period, from start-to-end, or pick specific lessons).
B. Student Application #
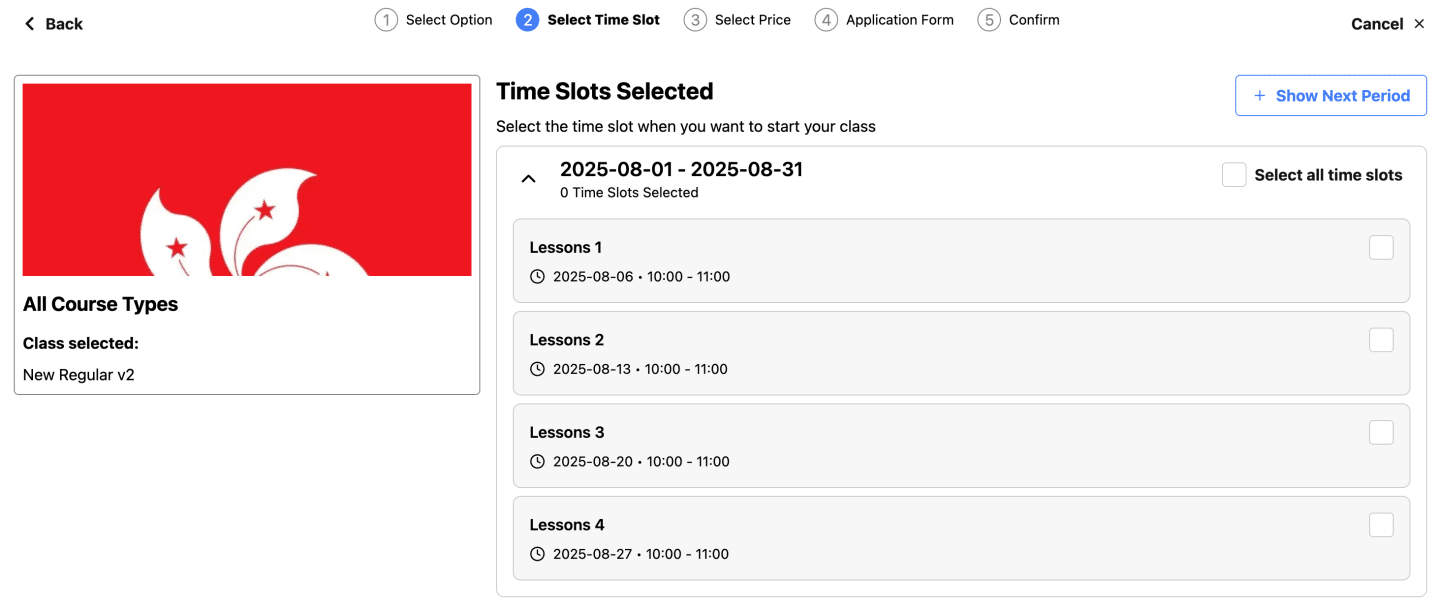
After you publish a Regular Class v2, students (or their parents) will use the front-end platform to view and apply for lessons. The interface is designed to make registration and selection easy and transparent.
- Lessons are grouped by period (e.g., each month or term is shown as a separate section).
- All generated lessons for each period are instantly visible—students can see dates, days, and times at a glance.
- Each lesson appears as a selectable time slot (checkbox or button).
- A “Select all time slots” option lets students book every session in a period with one click.
- Navigation allows scrolling or jumping between periods (for example, viewing next or previous months).
C. Enrollment Rules and Behaviors #
The way students can select lessons is controlled by the selection mode you chose during class setup:
- Must Select Entire Period
- Students are required to book all lessons within a period (e.g., the whole month).
- Useful for term-based classes or courses where all students move as a group.
- Must Select Until End of Period
- Students can join mid-period, but must book all remaining lessons up to the end of that period.
- Ideal for rolling admissions, but still organized in cohorts.
- Allow Custom Selection
- Students can freely pick individual lessons according to their own schedule.
- Useful for drop-in classes or when offering partial attendance.
Blocked or Unavailable Dates:
- Lessons on public holidays or school closures are not shown on the list of lessons.
- Any lesson that was skipped or edited by the admin will reflect the latest status.
Application Flow (Step-by-Step) #
- Student logs in and selects the course.
- Sees all available lesson periods (e.g., August 2025, September 2025).
- Selects lessons based on the selection mode (entire period, until end, or custom).
- Proceeds to confirm selection and complete application/payment.
Tip: The system enforces all selection rules automatically, so students can only apply according to your configured rules.
4. Step-by-Step: Setting Up a Regular Class v2 #
Step 1: Open the Calendar and Create a New Class #
- Drag on the calendar to select your desired start time.
- A modal will pop up—choose “Regular Class” as the class type.
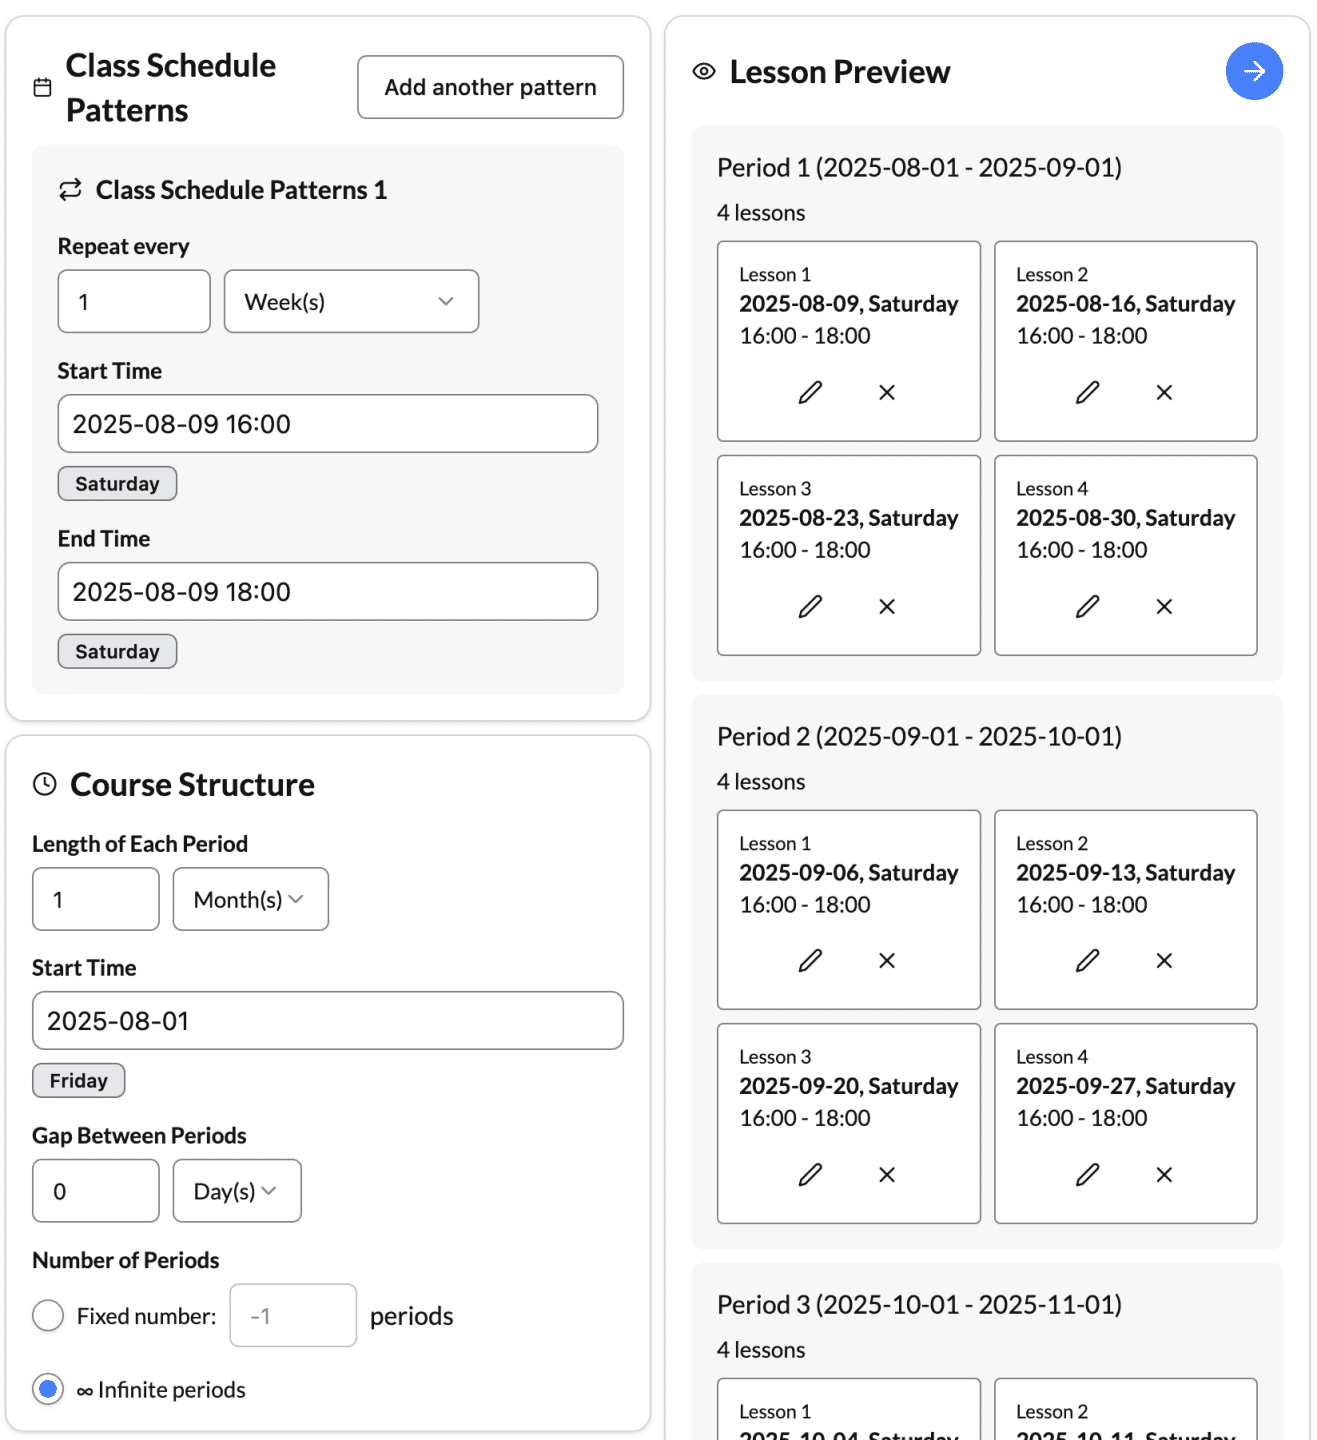
Step 2: Define the Schedule Pattern #
- Repeat Every: Choose the repeat unit (days, weeks, or months).
- By day: e.g., every 3 days
- By week: e.g., every Monday and Wednesday
- By month: e.g., 2nd and 4th Friday each month
- Start & End Time: Set lesson times for each selected day.
- Add multiple patterns if the class meets on different days/times.
Step 3: Set Up Course Structure #
- Length of Each Period: Define period size (e.g., 1 month).
- Gap Between Periods: Set breaks (e.g., 1 week gap between terms).
- Number of Periods: Choose fixed or infinite (ongoing) periods.
- Preview: Instantly see all generated lessons in the right panel.
Step 4: Adjust Dates (if needed) #
- Add/Skip Dates: Click the edit or cross icon in preview to add a makeup or skip a lesson. Overrides are automatically tracked.
- School Closures: Public holidays and closures appear automatically. Lessons on these days are blocked or highlighted.
Step 5: Choose Selection and Pricing Modes #
- Selection Mode:
- Must select entire period
- Must select until end of period (join mid-period)
- Allow custom selection (students pick sessions)
- Pricing Option:
- Price per period (e.g., $800 per month)
- Price per lesson (e.g., $200 per lesson)
- Advanced: Multiple pricing tiers/packages
Step 6: Save and Publish #
- All lessons are now auto-generated and visible on the calendar.
- Empty slots (no student yet) show as bordered, white boxes for easy tracking.
B. Typical Use Cases #
- Weekly after-school class (e.g., every Wednesday 10:00–11:00, forever)

- Monthly art workshop (e.g., 1st and 3rd Saturdays, 14:00–16:00)
5. Frequently Asked Questions #
Q: What if my schedule changes after setup?
A: Use the lesson preview to edit, add, or skip individual sessions. All updates are tracked and communicated to students.
Q: Can I set different prices for different periods?
A: Yes! You can define period-based pricing or custom per-lesson rates.
Q: Can I handle special makeups or extra sessions?
A: Yes, use “Add Date” to insert special sessions as needed.
Q: What about public holidays?
A: These are imported and blocked automatically—but you can override if your class will run on those days.
Q: What happens to my existing regular classes?
Migration: Old regular classes will remain as-is, but new classes must use this improved, period-based approach.
6. Migration Notice #
The previous manual method for regular class creation is deprecated.
- All new regular classes must use the new “Regular Class v2” period-based setup.
- Existing regular class lessons will remain accessible, but cannot be extended or edited in the old way.


