Create your first course #
Once you’ve customised your profile, it’s time to create your first course. To do this, click on the “Courses” tab in your Flowclass dashboard, then click on the “Create Course” button.
From there, you’ll be prompted to enter information about your course, including the title, description, and price. You can also choose to add additional sections to your course, such as a syllabus or course schedule.
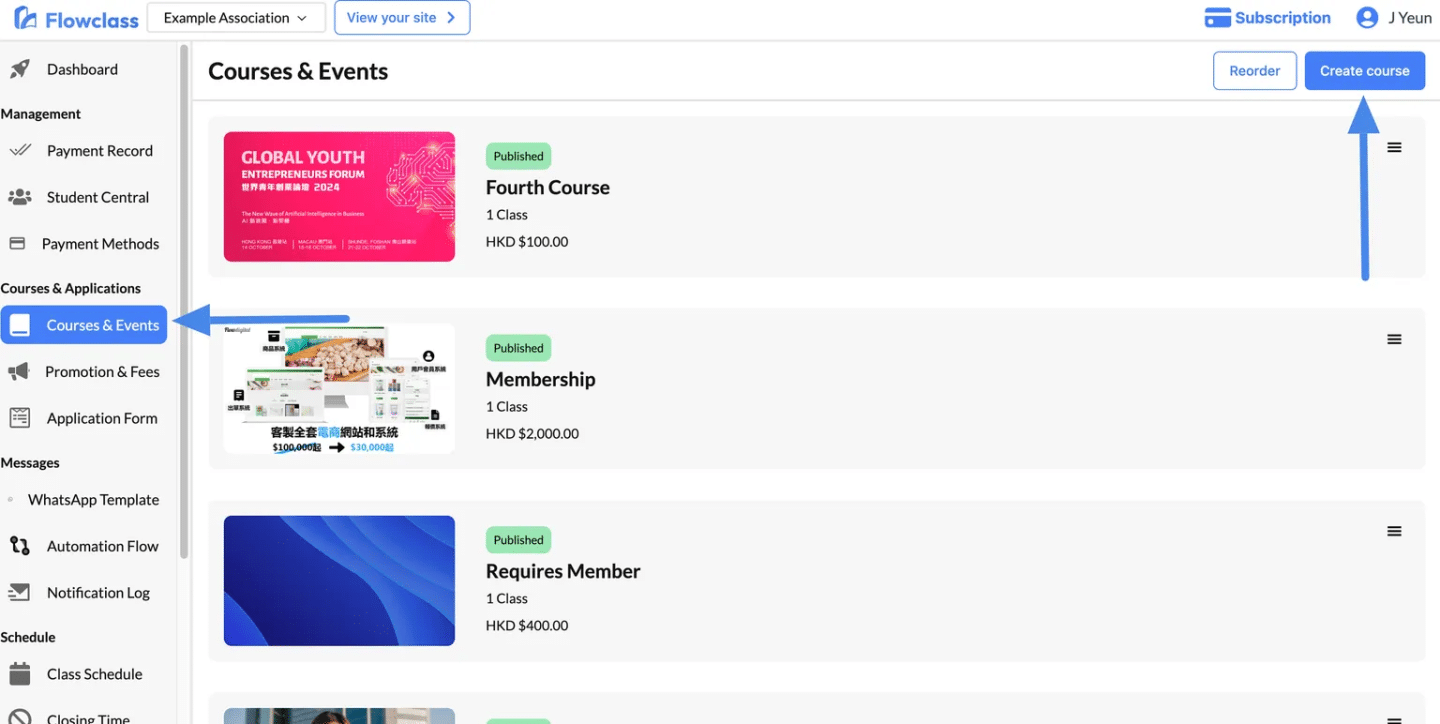
Step 1: Navigate to the Courses & Events Section #
- Log in to your Flowclass dashboard.
- In the left-hand menu, click on Courses & Events under the Courses & Applications section.
- You will see a list of your existing courses, both published and draft.
Step 2: Click on “Create Course” #
- In the top-right corner of the page, locate and click the Create Course button (as shown in the image above).
- A pop-up window will appear, prompting you to input details for the new course.
Step 3: Enter Course Details #
- Course Name:
- In the “Course name” field, enter the title of your course.
- Ensure the name is descriptive and engaging (e.g., “Digital Marketing 101” or “Advanced Coding Bootcamp”).
- Path:
- Assign a unique path (URL) for the course.
- Example: If your course is “Digital Marketing 101,” you can use “digital-marketing-101” as the path.
- The system will automatically generate a preview of the course link based on the path you provide.
Step 4: Create the Course #
- Once you’ve filled in the course name and path, click the Create button at the bottom of the pop-up.
- The system will create a new course page where you can start adding content and configuring settings.
Customizing your course page #
Setting up links and name #
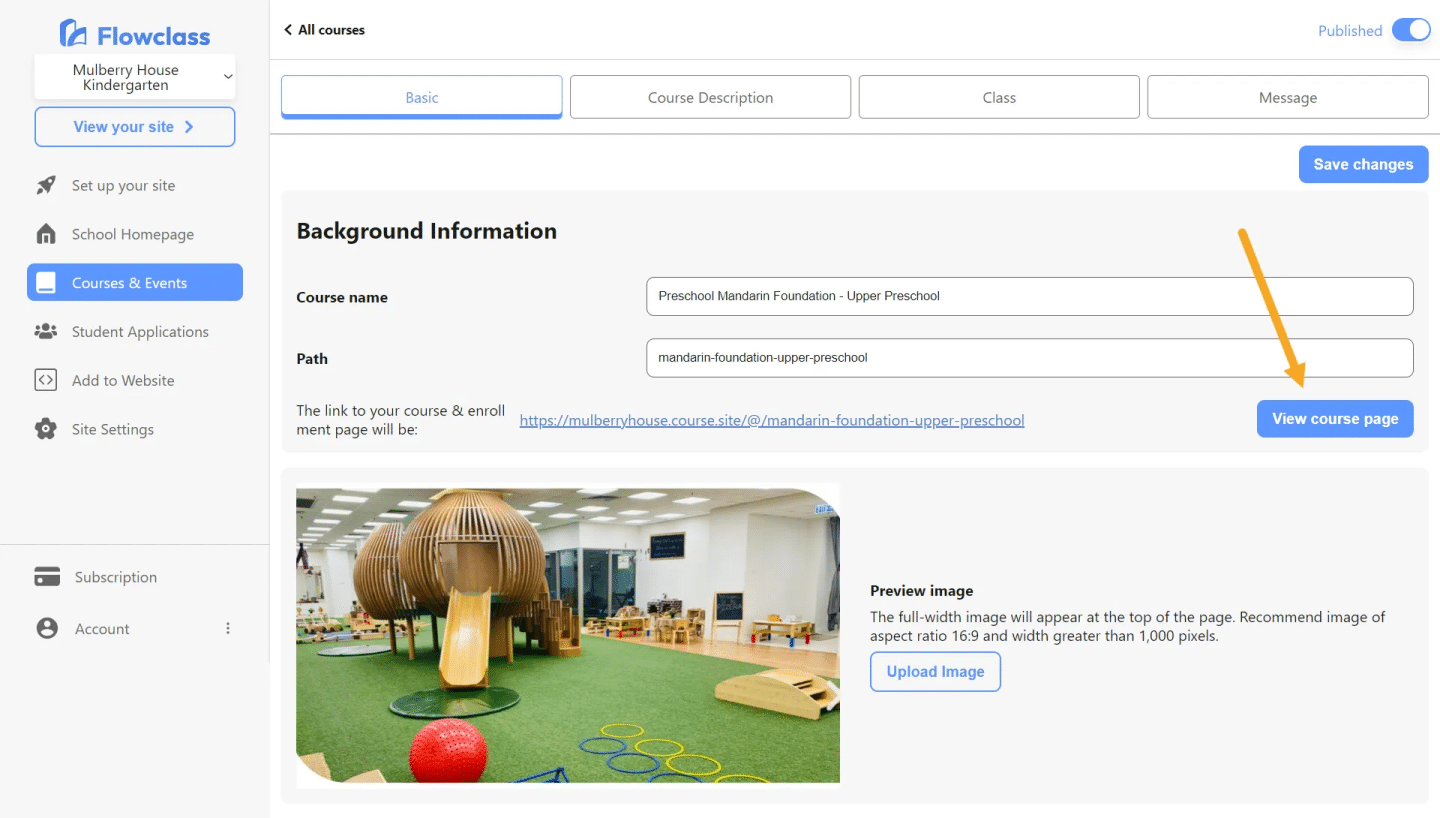
When setting up your course, there are three important elements to consider: the course name, the course path (URL), and the preview image (banner) for the course page. Here’s some information on each of these elements:
- Course Name: The course name should be clear, concise, and descriptive. It should accurately reflect the content and focus of your course. Choose a name that is engaging and instantly conveys what students can expect to learn. A well-crafted course name can capture the attention of potential learners and generate interest in your course.
- Course Path (URL): The course path, also known as the course URL or slug, is the unique identifier that students will use to access your course page. It should be simple, memorable, and relevant to the course content. Consider using keywords related to your course topic or a shortened version of your course name. A clean and easy-to-read course path can enhance the accessibility and visibility of your course.
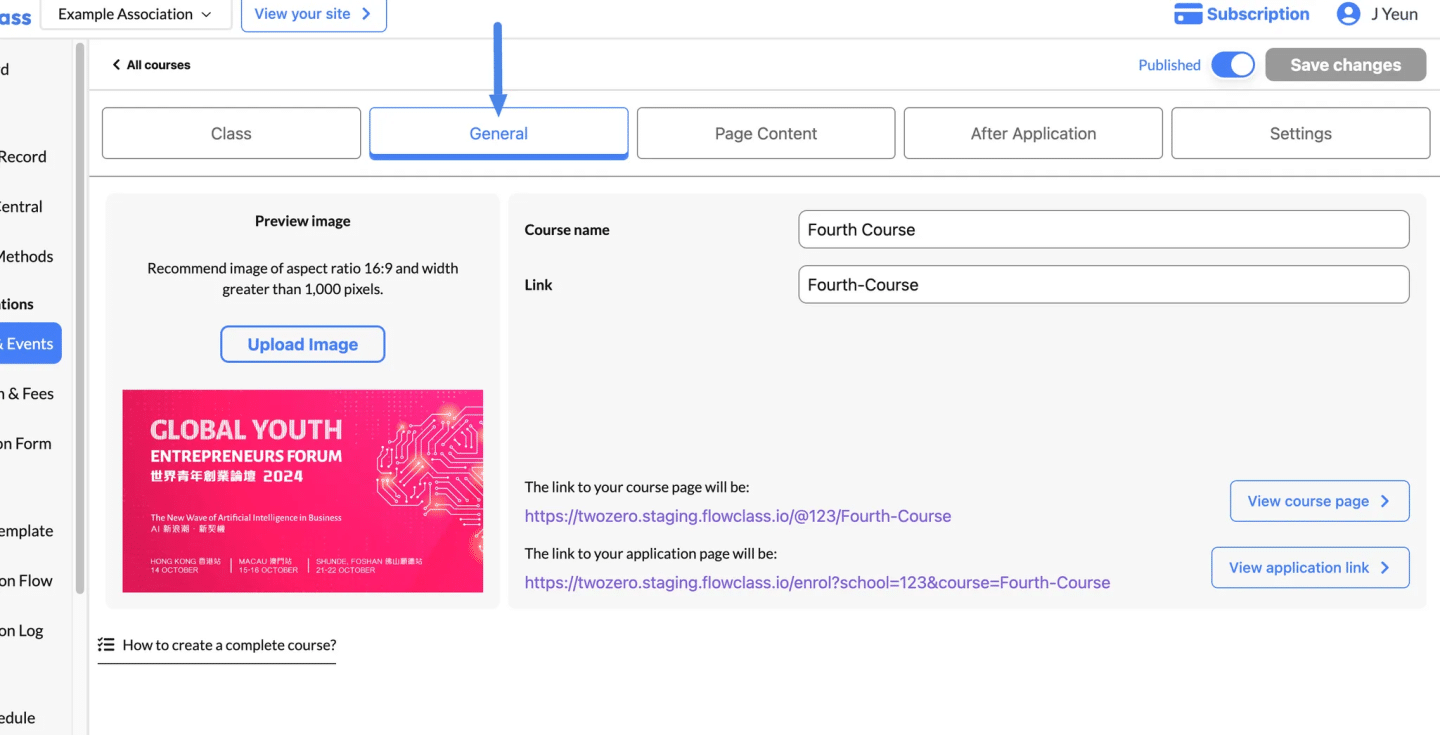
3. Preview Image (Banner): The preview image, often displayed as the banner at the top of your course page, serves as a visual representation of your course. It should be eye-catching, professional, and aligned with the course theme or subject matter. Select an image that effectively communicates the essence of your course and entices potential learners to explore further. A compelling preview image can significantly impact the first impression of your course.
Designing the Course Description #
The Page Content feature allows you to customize and organize text-based information on your homepage. It provides a rich text editor with various formatting options, enabling you to create visually appealing and structured content.
You will be able to understand more on how to use the editor by reading Set Up Home Page
How it looks on the website
Step 1: Access the Course Page Editor #
- Navigate to the Courses & Events section from the left-hand menu in your dashboard.
- Click on the course you want to customize.
- In the course settings, select the “Page Content” tab at the top of the page.
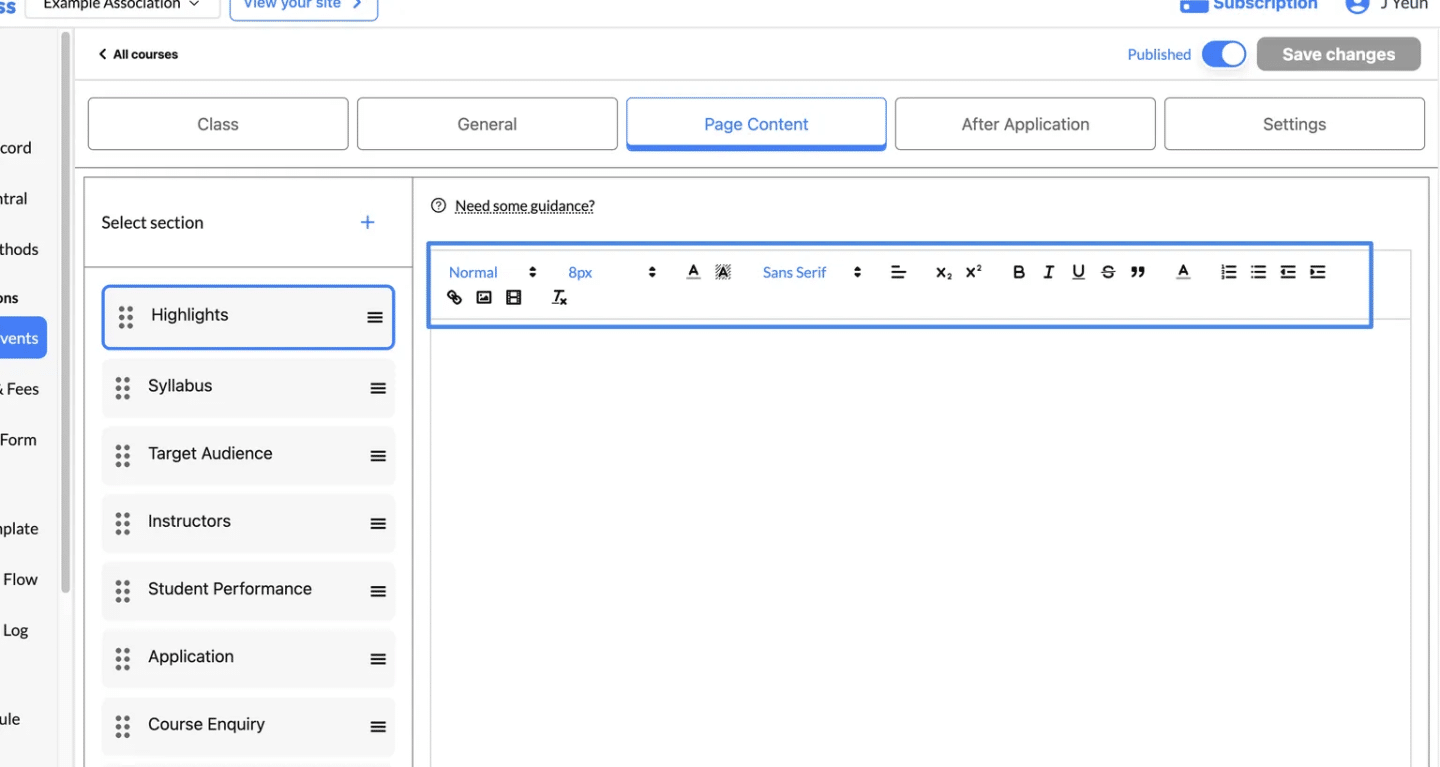
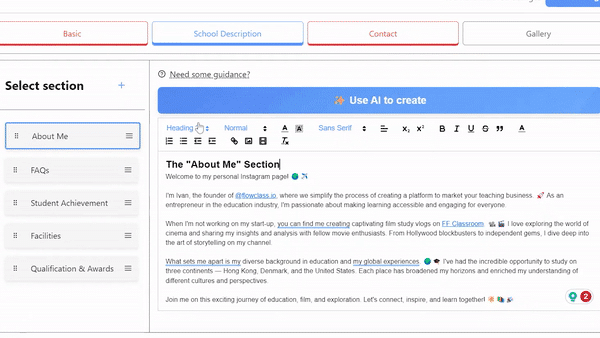
Step 2: Select a Section to Edit #
- In the Select Section panel on the left-hand side, you’ll see a list of available sections:
- Highlights: Add a brief overview of the course’s key features.
- Syllabus: Provide a detailed breakdown of the course structure.
- Target Audience: Define who the course is designed for.
- Instructors: Highlight the qualifications and expertise of the instructors.
- Student Performance: Showcase student achievements or testimonials.
- Application: Include instructions for applying to the course.
- Course Enquiry: Provide a place for prospective students to ask questions.
- Click on the section you want to edit (e.g., Highlights) to open the editor.
Step 3: Edit and Format Content #
- Use the rich text editor to add or update content for the selected section.
- Format your content using the toolbar options:
- Text Styling:
- Bold (
B) and Italic (I) for emphasis. - Underline (
U) or Strikethrough for variations.
- Bold (
- Font Options:
- Adjust font size (e.g.,
8px,10px) and style (e.g., Sans Serif).
- Adjust font size (e.g.,
- Alignment:
- Align text to the left, center, right, or justify it.
- Lists:
- Create numbered lists or bulleted lists for structured information.
- Hyperlinks:
- Add links to direct users to external resources or other sections of your site.
- Media:
- Insert images or videos to make the content visually appealing.
- Special Formatting:
- Add blockquotes, superscripts, and subscripts for specific use cases.
- Text Styling:
Writing a good course description
When writing a good course description to showcase the course content on the frontend, educators can include the following sections:
- Overview: Provide a concise overview of the course, highlighting its key objectives, target audience, and the benefits students can expect to gain from taking the course.
- Features: Highlight the unique features and advantages of the course, such as interactive exercises, practical projects, expert guidance, or access to additional resources.
- Syllabus: Present a clear and organized syllabus that outlines the topics, modules, or lessons covered in the course. This helps students understand the structure and progression of the content.
- Instructor Information: Briefly introduce the instructor, emphasizing their expertise, experience, or qualifications in the subject matter. This helps build credibility and trust among potential students.
- Target Audience: Describe the ideal audience for the course, including any prerequisites or recommended background knowledge. This helps students determine if the course is suitable for their skill level or interests.
Step 4: Add or Reorder Sections #
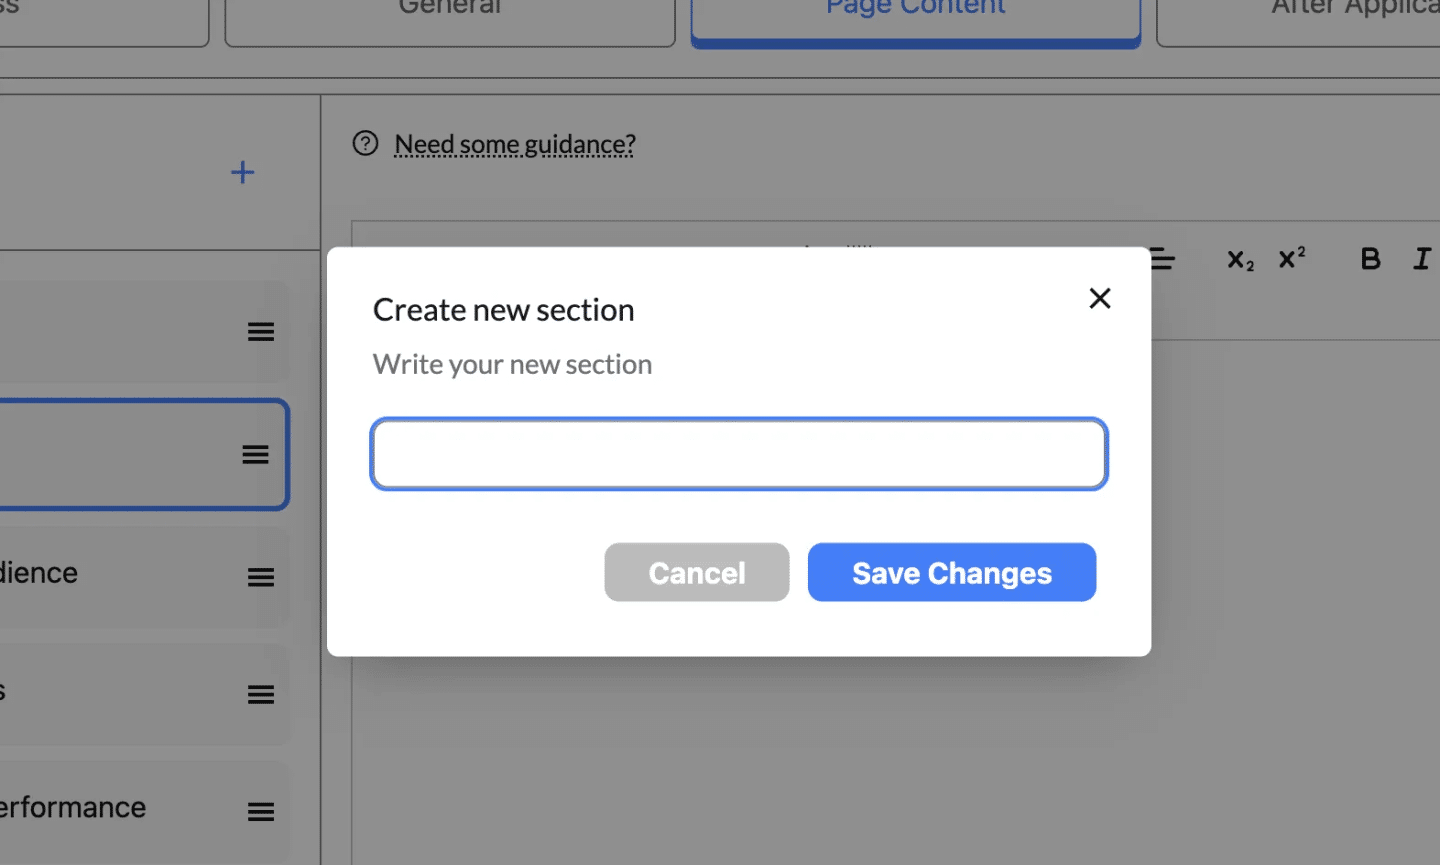
- Add a New Section:
- Click the “+” button next to the “Select Section” panel to create a new custom section.
- Provide a title for the section and start editing its content.
- Reorder Sections:
- Use the drag handle (three horizontal lines) next to each section name to rearrange the order.
- Drag and drop sections to organize them based on priority or flow.
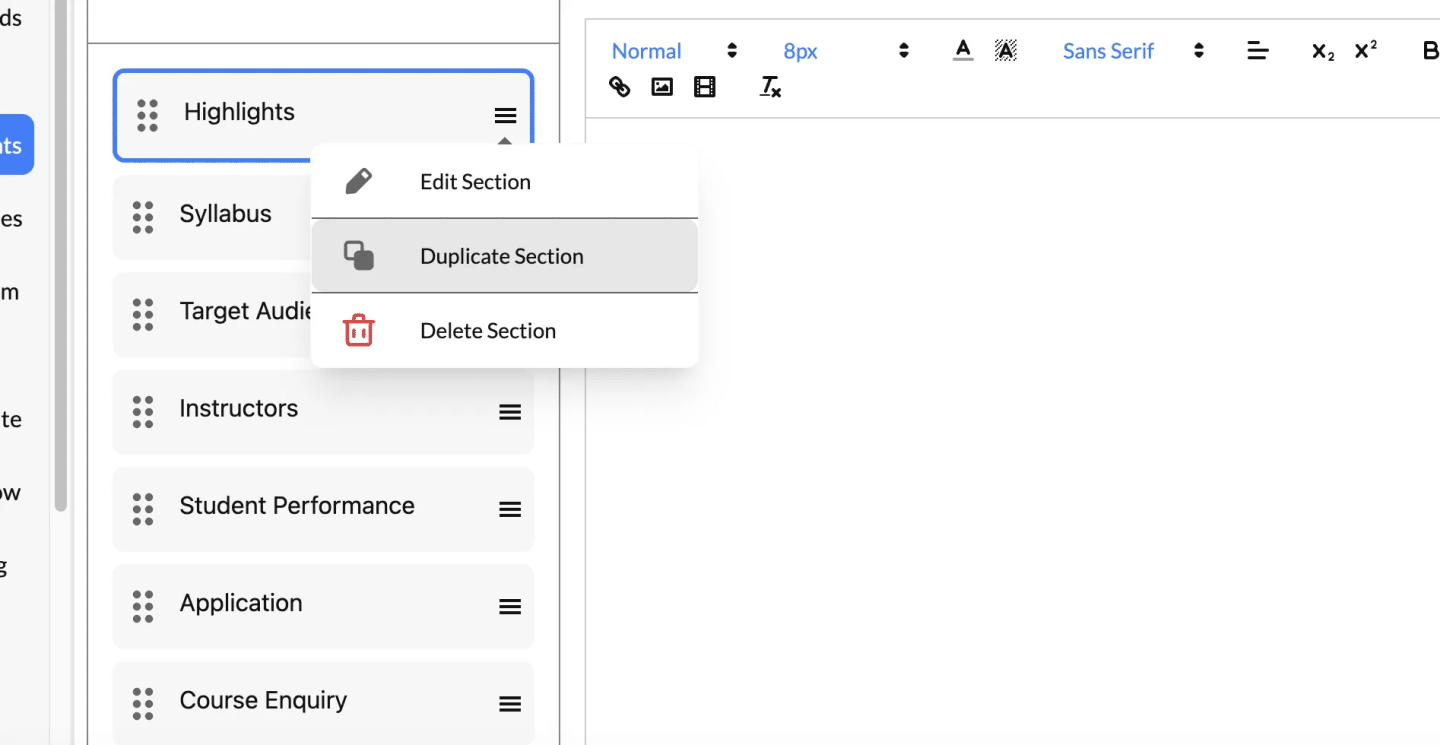
Step 5: Duplicate or Delete a Section #
- Duplicate a Section:
- Select Duplicate Section from the dropdown menu.
- A copy of the selected section will appear under the original, allowing you to reuse the content with slight modifications.
- Tip: This is useful when creating similar sections with minor tweaks, such as repeating formats for different course modules.
- Delete a Section:
- Click Delete Section from the dropdown menu.
- A confirmation message will appear to ensure you want to delete the section permanently.
- Confirm the deletion if you no longer need the section.
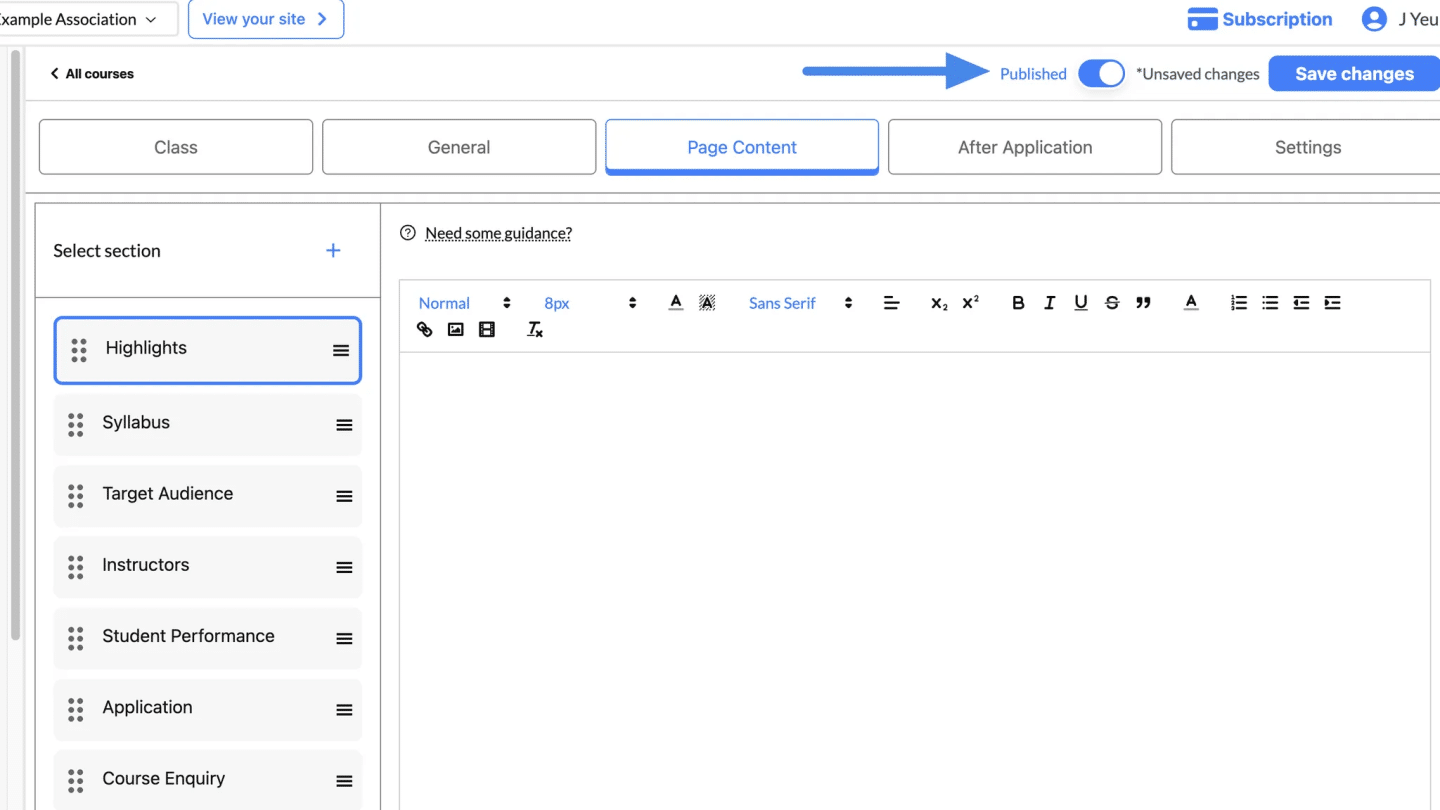
Step 6: Save Changes #
- After making edits, click the “Save Changes” button at the top-right corner of the page.
- Ensure the Published toggle is turned on so the updates are visible to users.
Set up SEO Settings #
Optimizing your course page with SEO settings is an important step to improve its visibility on search engines, attract more students, and ensure the course appears in relevant search results. Here’s how to configure the SEO settings and what the final result looks like.
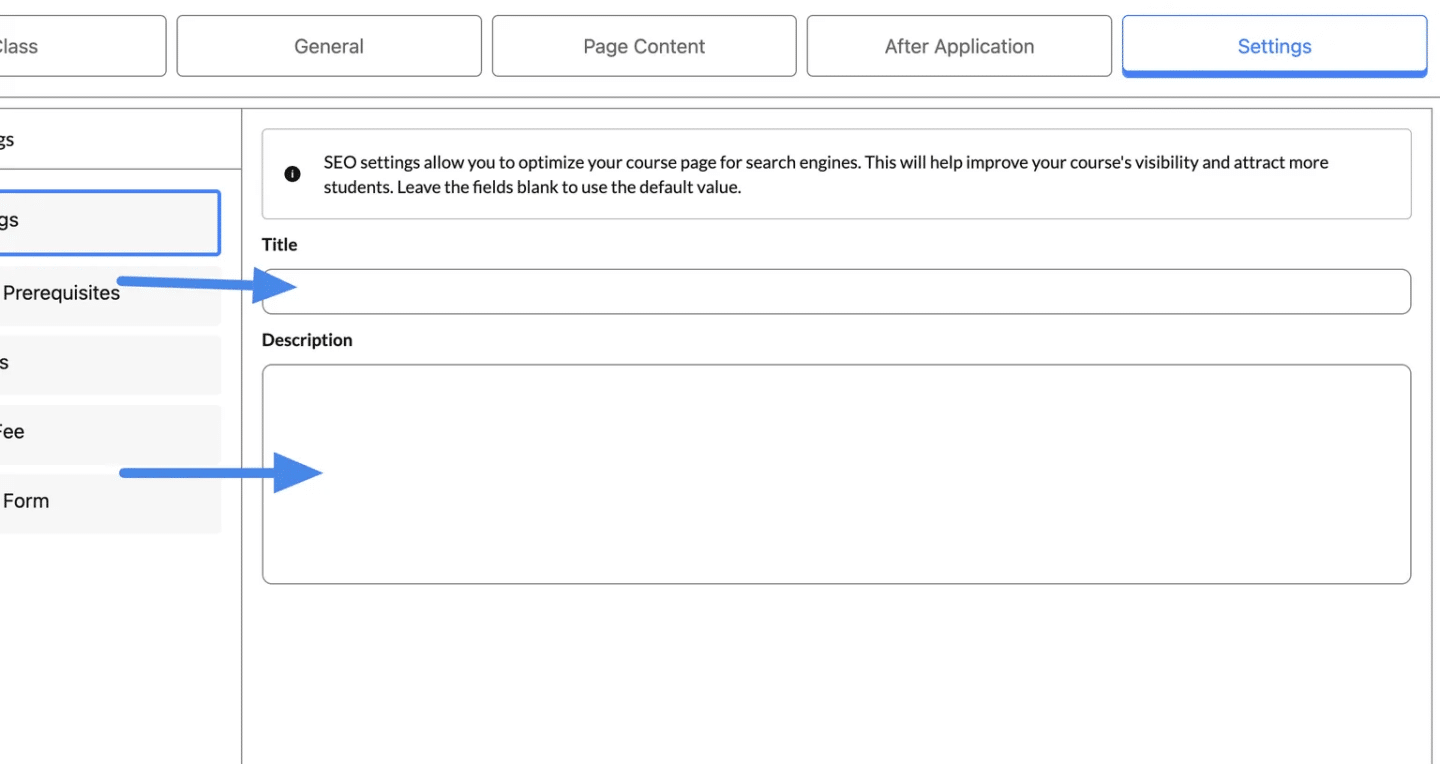
How to Configure SEO Settings #
- Navigate to SEO Settings:
- From the Courses & Events section, select the course you want to optimize.
- Go to the Settings tab and click on SEO Settings from the menu on the left.
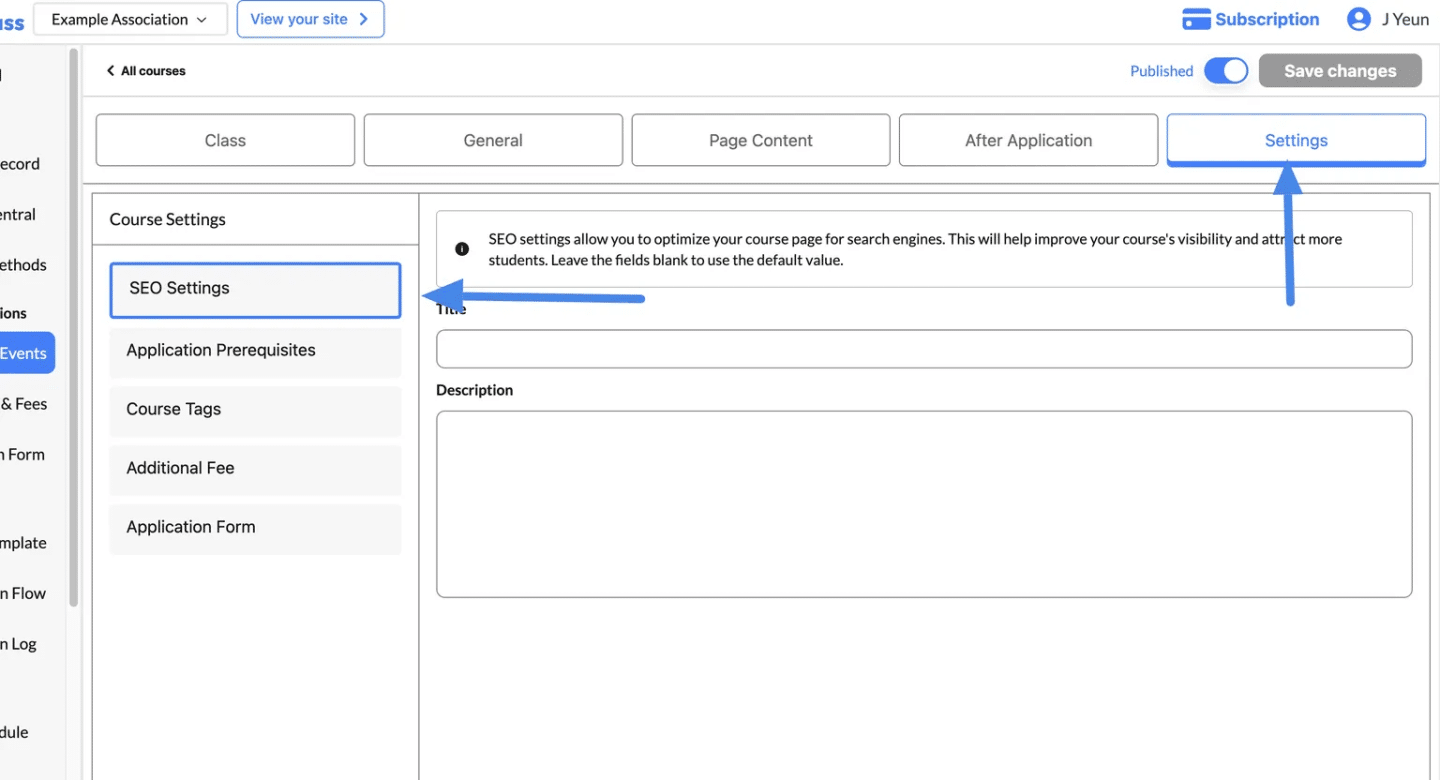
- Enter the Title:
- Add a concise and descriptive Title for your course.
- This title will appear as the clickable link in search engine results (e.g., “Third Course”).
- Add a Description:
- Write a brief, keyword-rich Description that clearly explains the purpose, content, and benefits of the course.
- This description will appear below the title in search results and should entice users to click.
- Save Changes:
- Once you’ve added the title and description, click Save Changes to apply the SEO settings.
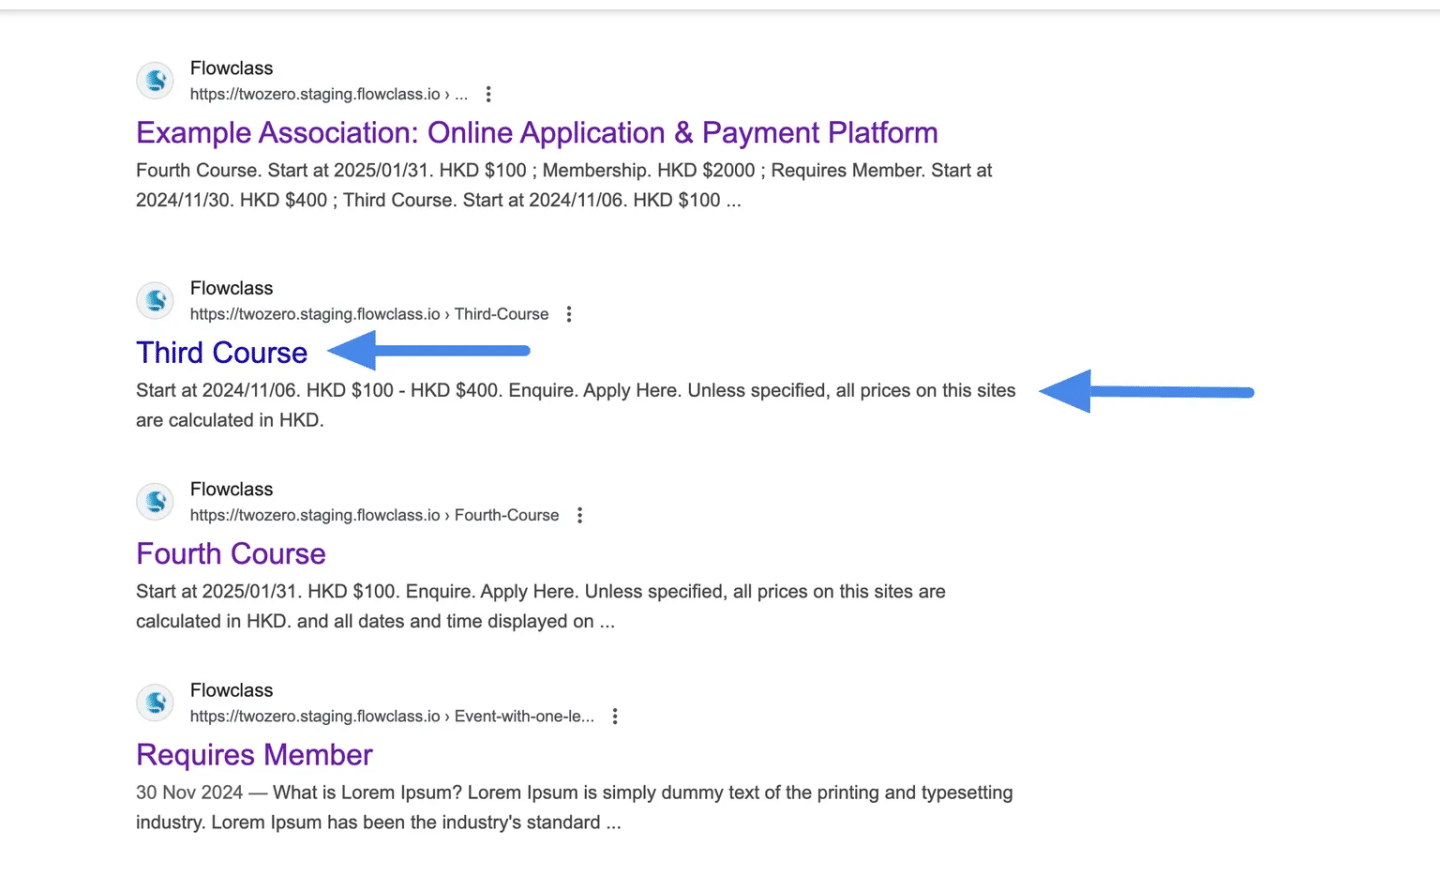
Final Result in Search Engines
After setting up the SEO, your course will appear in search engine results with the following:
- Title: The clickable link to your course (e.g., “Third Course”).
- Description: A brief summary of the course highlighting key details and benefits.
Example:
- Title: “Third Course”
- Description: “Start at 2024/11/06. HKD $100 – HKD $400. Enquire. Apply Here. Unless specified, all prices on this site are calculated in HKD.”
This ensures your course listing is professional and informative, increasing the likelihood of user engagement.
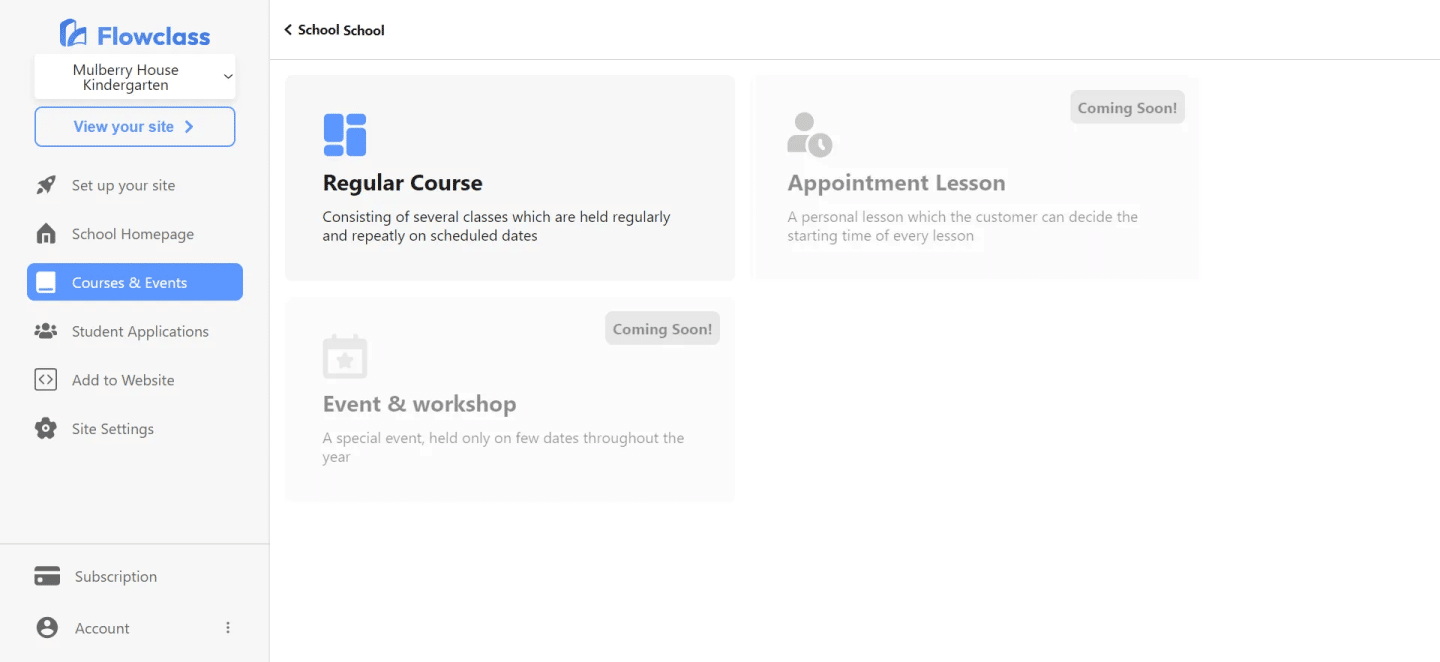
Choosing the right class #
When choosing the type of course to create, it’s important to consider the specific needs and preferences of your target audience.
Here’s a short description of each course type to help you make an informed decision:
- Regular Course: Structured classes are held regularly on scheduled dates for sequential learning.
- Appointment Lesson: Personalized lessons with flexible starting times chosen by the customer.
- Event & Workshop: Special, intensive learning experiences held on specific dates to focus on specific topics or skills.
More details of setting up each kind of classes can be found here:
Now that you’ve created your course, it’s time to set up your booking and payment system. This is where students will be able to sign up for your course and pay for it online.
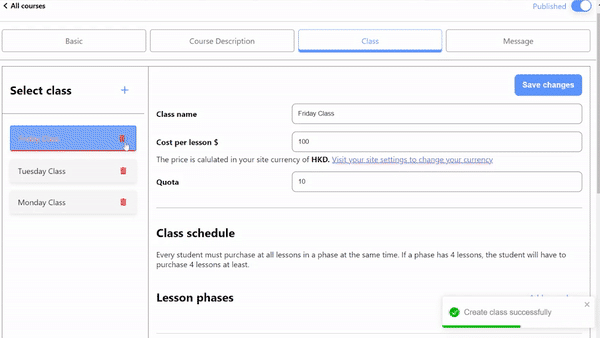
Step 1: Setting the class name #
When setting the class name, it’s important to be descriptive and concise. Consider including relevant information such as the weekday and target audience to provide clarity. Here’s an example:
Class Name: Weekday Beginner Guitar Class
By including the weekday in the class name, such as “Weekday,” students immediately know the specific day of the week the class will be held. Adding “Beginner” indicates the level of proficiency expected, helping potential students determine if the class is suitable for their skill level.

The cost per lesson refers to the price that students need to pay for each individual lesson in the course. The tuition is calculated by multiplying the cost per lesson by the number of lessons the student intends to take. The formula for calculating tuition is as follows:
Tuition = Cost per lesson x Number of lessons
This formula allows students to determine the total cost they will incur based on the number of lessons they plan to enroll in.
Additionally, the quota represents the maximum number of people who can enrol in the course.
Step 2: Setting the phases of your class #
Hierarchy:
- Course: The overarching program or subject of study.
- Class: A specific instance or session within a course, typically consisting of multiple lessons.
- Phase: The minimum block of lessons that a student must purchase at the same time.
Concept of a Phase:
- A phase represents a defined set of lessons within a course.
- It serves as a unit of enrollment, where students commit to a specific block of lessons.
- Phases can be based on a specific timeframe, such as a month, or a predetermined number of lessons.
- For example, a one-month course may have a phase that includes all the lessons scheduled within that month.
Tuition Calculation:
- The tuition for a phase is calculated by multiplying the number of lessons in the phase by the lesson fee.
- This ensures that the tuition accurately reflects the specific set of lessons the student is enrolling in.
Joining a Phase Mid-Lesson:
- Students have the flexibility to join a phase even if it has already started.
- If a student joins a phase after it has begun, they only need to pay the tuition fee for the remaining lessons in the phase.
- For example, if a phase consists of eight lessons and a student joins at the fourth lesson, they would only need to pay the tuition fee for the remaining lessons (lessons 4-8).
By allowing students to join a phase mid-lesson, we provide flexibility and accommodate varying schedules, enabling them to start their learning journey at a convenient time while ensuring fair tuition payment based on the remaining lessons in the phase.
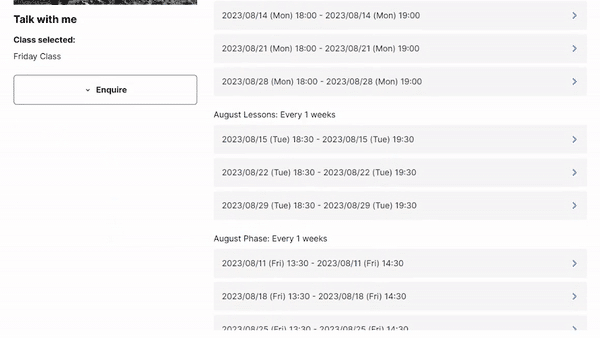
Step 3: Generating the list of lessons #
Our function has the capability to generate all the necessary lessons within a phase based on a starting lesson and an ending lesson. Additionally, you can specify the frequency at which the lessons should repeat. Here’s how it works:
- Starting Lesson: You provide the starting lesson number for the phase, indicating where the sequence of lessons should begin.
- Ending Lesson: You specify the ending lesson number, which determines the last lesson in the phase.
- Frequency: You can set the frequency at which the lessons should repeat within the phase. For example, if you set the frequency to “weekly,” the lessons will be generated with a one-week interval between each lesson.
Using this information, our function generates all the lessons required for the phase, ensuring that the lesson sequence follows the specified frequency. This allows for easy creation and management of lesson schedules within each phase.
Step 4: Publish the course #
After everything’s done, switch on “Publish” in the upper right-hand corner, and you’ll be able to visit your course page.
Congratulations! You are now ready to accept students using Flowclass.


