Connecting a custom domain to your platform ensures a professional web presence and enhances user trust. Follow these clear instructions to configure your custom domain using AWS Certificate Manager (ACM), CloudFront, and EC2 Load Balancer.
Contact Us for Pre-Migration Configuration #
Step 1: Purchase a domain name #
Before setting up your custom domain, you’ll need to purchase a domain name from a domain registrar such as GoDaddy or Namecheap. Choose a domain name that is easy to remember and reflects your brand or website.
Step 2: Contact us #
You can contact our support through this WhatsApp link or send an email to info@flowclass.io with the title of “Custom Domain: (your domain name)”
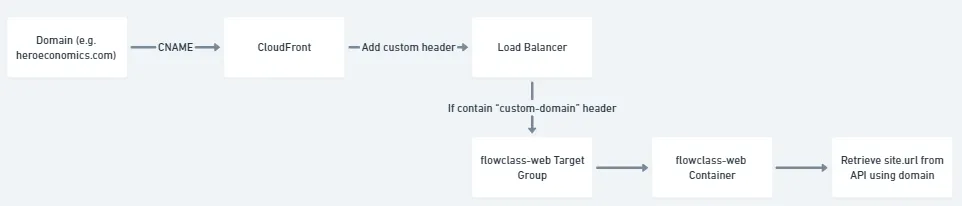
Custom domains require backend configurations that we will handle for you. These configurations include creating and setting up a CloudFront distribution for your domain.
- Reach Out to Us:
- Contact our support team with the following details:
- Your custom domain name (e.g.,
www.example.comor.example.com). - Any additional subdomains or alternative domain names you want configured.
- Your custom domain name (e.g.,
- Let us know if you have specific requirements, such as caching policies or headers.
- Contact our support team with the following details:
- Wait for Our Team to Complete the Setup:
- We will create a CloudFront distribution customized for your domain and backend requirements.
- Once completed, we will send you the CloudFront Distribution Name (e.g.,
abc123.cloudfront.net).
- Verify the Distribution Name:
- Double-check the distribution name we provide to ensure accuracy.
- Keep this information ready for the DNS setup step.
Setting Up Domain Records #
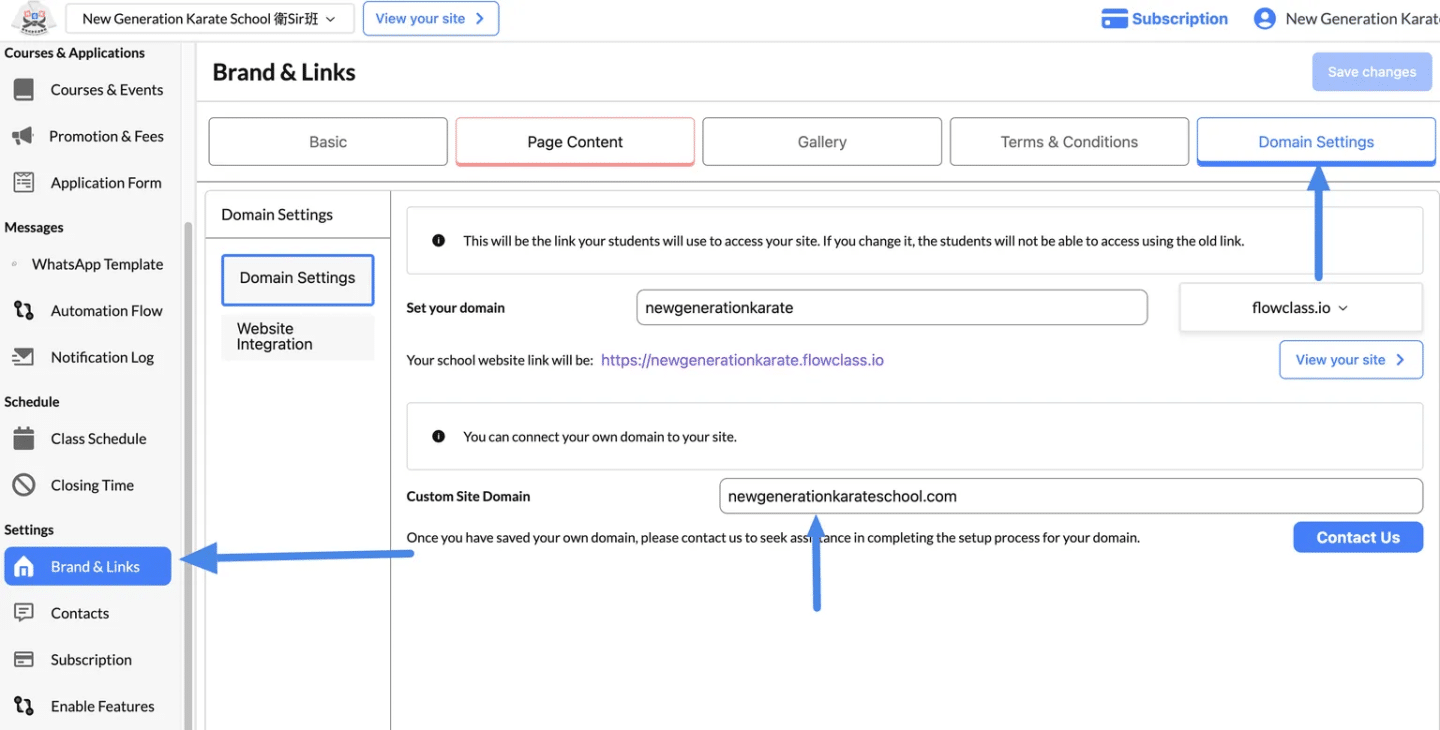
Step 1: Update Flowclass Settings #
- Log In:
- Sign in to your admin dashboard.
- Navigate to Domain Settings:
- On the left-hand menu, go to Brand & Links.
- Click on the Domain Settings tab at the top of the page.
- Set Your Custom Domain:
- In the Custom Site Domain field, enter your custom domain (e.g.,
newgenerationkarateschool.com). - Click Save Changes.
- In the Custom Site Domain field, enter your custom domain (e.g.,
Step 2: Access Your DNS Settings #
Once you’ve purchased your domain name, you’ll need to access your DNS settings. This is where you’ll create a CNAME record to link your domain name to your Flowclass website.
The steps to access your DNS settings may vary depending on your domain registrar, but it’s typically found under the “DNS Management” or “Domain Management” section of your account.
Examples of Common Domain Registrars
Here’s a list of popular domain registrars and where you can typically find the DNS settings:
1. GoDaddy
- Steps to Access DNS Settings:
- Log in to your GoDaddy account.
- Go to My Products and find your domain name.
- Click DNS or Manage DNS next to your domain.
2. Namecheap
- Steps to Access DNS Settings:
- Log in to your Namecheap account.
- Go to Domain List from the dashboard.
- Click Manage next to your domain and navigate to the Advanced DNS tab.
3. Bluehost
- Steps to Access DNS Settings:
- Log in to your Bluehost account.
- Navigate to Domains > My Domains.
- Click the DNS tab for the domain you want to edit.
4. HostGator
- Steps to Access DNS Settings:
- Log in to your HostGator account.
- Access the Domains section from the dashboard.
- Click Manage Domains and then go to the DNS tab.
5. Cloudflare
- Steps to Access DNS Settings:
- Log in to your Cloudflare account.
- Select your domain from the dashboard.
- Navigate to the DNS tab to modify records.
6. Squarespace
- Steps to Access DNS Settings:
- Log in to your Squarespace account.
- Go to Settings > Domains.
- Select your domain and manage DNS settings.
7. NameSilo
- Steps to Access DNS Settings:
- Log in to your NameSilo account.
- Go to Manage My Domains.
- Select your domain and click DNS Records to make changes.
Step 3: Create a CNAME record #
Pointing your domain to the CloudFront distribution ensures users can access your site using your custom domain securely.
- Log in to your domain registrar (e.g., GoDaddy, Namecheap).
- Add a CNAME Record:
- Name: Your custom domain (e.g.,
www.example.com). - Value: The CloudFront Distribution Name provided by us (e.g.,
abc123.cloudfront.net).
- Name: Your custom domain (e.g.,
- Save the changes and allow DNS propagation (this can take up to 24 hours).
It may take some time for your DNS settings to propagate, which means that your custom domain may not be immediately available. This process can take anywhere from a few minutes to a few hours, depending on your domain registrar.
Step 4: Test Your Domain #
- Visit your custom domain (e.g.,
www.newgenerationkarateschool.com) in a browser. - Ensure it loads securely over HTTPS and displays your site correctly.
- Test additional domains or subdomains to verify functionality.


